Dr Andrew Weatherall does prehospital doctor stuff but spends lots of time serving the somnolent god of anaesthesia in a tertiary paediatric hospital. He has particular interests in cardiac, thoracic, trauma and liver transplant anaesthesia and is trying to be a PhD student in his spare time. You can also find him as @doc_andy_w
Little creatures have the potential to cause significant stress. It’s true of spiders. It’s true of parasites. And for many medicos, it’s true of paediatric patients. All too often, the experienced clinician confronted with the alien life-form of a kid goes through a rapid medical devolution, retreating to the almost foetal uselessness of a medical student confronted for the first time by having to do a procedure they’ve only read about.
![Dance all you like tiny peacock spider, still wary. [via Jurgen Otto on Flickr under "Some Rights Reserved CC licence 2.0]](https://careflightcollective.com/wp-content/uploads/2014/08/peacock-copy.jpg?w=300&h=217)
Managing the paediatric airway is a case in point. It is different. There are all those annoying calculations to remember. Everything feels the wrong size. The things that should be easy, like bag-mask ventilation, seem unusually clumsy. It’s as if someone managed to switch your shoes onto the wrong feet and then asked you to run.
When doing time in the paediatric theatres we frequently have experienced clinicians dropping by to brush up on their paediatric airway skills. From an observer’s point of view, there are little technical things that crop up repeatedly and cause grief. They are also the sort of technical hitches that distract from the mental process of getting the job done. If these little things were addressed, the prospect of the paediatric airway should be no more daunting than the prospect of participating in a yawning competition at the local retirement village lawn bowls competition.
So here, in no particular order, are the commonest practical things I see clever people forget:
- A Light Touch
True paediatric patients are not big. Unlike the momentarily moribund wildebeest of adult medicine, they do not require brute strength. Airway management starts with good bag-mask technique and that should be easy (I am making the assumption that they don’t have the sort of condition that makes people widen their eyes when flicking through the ‘big book of syndromes’).
All too often those who do medical stuff in big people seem to want to subdue the small scruff of a paediatric patient with the big unwieldy shovels they refer to as ‘hands’. In smaller kids, it is really hard to apply good bag-mask technique if you try as you would in an adult, with a digit behind the angle of the jaw and other fingers arranged along the mandible.
Try this one – lay your middle finger gently across the soft tissue just where the neckline starts to head up to the chin (yep, right in the midline). Gently stretch the skin up to the jaw line with that middle finger (almost like you’re pushing the little ridge of skin up to the chin). Now add the mask with your index finger and thumb holding it to the face as per normal. You should have an open airway. That’s all the effort it takes (if that’s as clear as mud, let me know and I’ll try to produce a better version).
- Puff
Smaller kids desaturate quickly. Whether or not you’ve done nasal prong oxygenation, you should feel at liberty to gently provide ventilations while waiting for the muscle relaxant to reach “apparent serenity now” efficacy.
- Know Your Equipment
If you are going to use different equipment it pays off to know the details of the kit. This seems really obvious, but all too often the occasional paediatric airway specialist gets so focussed on the other bits of getting the job done they take the equipment stuff for granted and things get messy at some point after everyone thinks crunch time has been and gone.
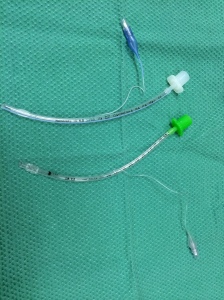
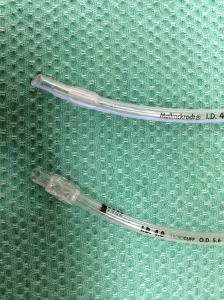
Here’s an example. Observe the photo of two different kids endotracheal tubes. The one on the bottom is a bit more custom-designed for kids. Another popular brand up top looks pretty much like a down-sized adult endotracheal tube.

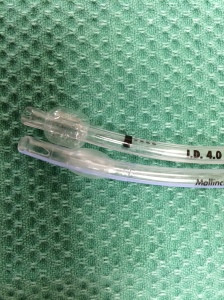
When you look closer, you might notice that the one on the bottom has an obvious black line where the tube is intended to line up with the cords. If you place it there, the tip of the tube is usually in a good spot, and the distance between cuff and cords is actually a fair bit.

Now look at the one on the top by comparison. The cuff ends around where that black line is. So if you place this one with the cuff a bit beyond the cords, you have successfully achieved lung isolation (kudos to you). Sometimes in bringing it back to where both lungs benefit from the cool breeze generated by your relieved bagging, the cuff could be sitting in the cords. Bugger.

Knowing which one you carry (or should carry) matters. Same goes for choice of laryngoscope (and the resultant changes in positioning the patient). Speaking of which …
- Keep an eye on the forest
You get handed a straight-blade laryngoscope to intubate a child (the fact that I’d probably choose a curved blade in pretty much every paeds patient is an entirely separate rant). Your job is to get a view on laryngoscopy that permits successful intubation. Your job is not to pick up the epiglottis. Do not confuse a popular choice for during the intubation with your daily KPI.
If placing the tip of the blade in the vallecula is what works, do that and put the tube in.
- Use Cuffed Tubes
Shouldn’t we be choosing uncuffed tubes? Really? Just because you prefer harder to manage ventilation with a high chance of needing to change the tube entirely? Or are you a staunch supporter of tradition in medicine? Even where that tradition was established because the perished rubber endotracheal tubes with their low volume high pressure cuffs made of rubberised sandpaper were causing complications?
Seriously, just use cuffed tubes (and check the cuff pressure regularly). That way you get to do it just the once before the high fives rather than trying to figure out how to calibrate the ‘leak’.
- Noses are for other doctors
There is no need for all endotracheal tubes in paediatric patients to be nose snorkels. A secure airway is the goal, and that is best done with a quick oral intubation. The number of doctors I see who seem to have the impression that neophyte airways means nasal airways in all circumstances never ceases to astonish.
So there’s just 6 quick tips to get the practical bits sorted. Is it absolutely exhaustive? No, but these are things I keep seeing (so you can grade the level of evidence as “stuff I see heaps and heaps that I thought I’d mention”). If you’ve got others (or disagree) I’m always all ears.
The aim is to help anyone get to the natural state of things – where ill kids needing intubation aren’t the scary ones. It’s healthy 3 year olds drinking red cordial at a party that inspire true fear.
Note:
This post is meant as a chance to share stuff seen through observation. If anyone is keen, I can follow up with the broader rant with the working title of “the variety of ways all that stuff about paediatric airways turns out to be kind of rubbish”, or the “choose the cuffed tube” rant in full.

Reblogged this on PHARM.
LikeLiked by 1 person
can I hear the full rant that is ” Choose the cuffed tube”, please?
LikeLiked by 2 people
Thanks for reading Minh. Request duly noted. I’ll get back to that one in a few weeks (have a little side trip to Rwanda in the meantime) – that particular topic will come as a referenced variety, as it’s slightly different to the “direct observation of stuff” post here.
LikeLike
Agree – rant on, please
LikeLiked by 1 person
Reblogged this on The Caffeinated Gas Monkey and commented:
Six paediatric pearls of wisdom. Love the simplicity. Looking forward to future “rants”!
LikeLiked by 1 person
Thanks for reading and so pleased you liked it. As I said, not an exhaustive list but the common things I see. The follow-ups are actually on topics where there’s more in the literature rather than just direct observation.
LikeLike
mate, I agree about the straight blade bullshit
LikeLike
There’s actually 2 comments I’ve embedded within that sentence.
1. A straight blade is a legitimate tool obviously, but it does require a different technique to a curved blade. In neonates it may have advantages because of the disposition of the laryngeal structures and epiglottis.
However it comes with compromises. It is far harder to control the tongue (which is obviously a big issue for little tacker airways). You are left with a much smaller visual space to work in because the whole laryngoscope doesn’t have much height. Then of course for the occasional user you’re not as familiar. I think most times with external laryngeal manipulation you can very comfortably get an adequate view of the cords (the soft tissues are really soft) then you have more room to see what is going in and don’t get distracted by losing sight of the cords as you introduce the tube.
2. As I understand it (happy to be corrected) the original description of use of the straight blade did not specify you had to pick up the epiglottis (I think it suggested the vallecula actually). Occasionally I see people so fixed on the idea they must pick up the epiglottis they forget to look for whether they can see where the tube should go. Or that they must always go a long way in with the laryngoscope and then pull back until they get the view. It’s a subtle distinction but I think you should focus on the goal which is to see adequately to intubate, not employ a technique rigidly and intubate when it delivers the view it gives.
My personal practice is to try and get a view gently on the way down with the blade as I find orientation works that way. If the view is OK with the epiglottis not picked up, I put the tube in. If I need to try and control the epiglottis I do. And if the view isn’t great (assuming I’m not already back to bag-mask to manage the bigger picture of oxygenation), I’ll then try placing the blade in further then slowly coming back. I think it’s useful to have options for techniques.
LikeLike
Can you expand a little bit on what I’m doing with my middle finger using the technique you describe? I’m not entirely confident in my visualization of the process, thanks!
LikeLike
Hi Vince,
Sorry for the slow reply (a little in and out on internet access at the moment).
It’s probably more that I didn’t describe it that well (and keep in mind it’s really most applicable to neonates/infants).
1. Maybe think first of starting with the finger resting on the tip of the chin. Then gently slide that finger down to where you meet the anterior skin of the neck.
2. Now, with the gentlest bit of pressure, drag that middle finger back up to rest just at the chin again. When you do this, you should see sort of a little wrinkle of skin just in front of your finger, like you pushed a ripple up. It usually makes the kid pout a tiny bit. The skin on the anterior neck should be under gentle tension.
3. With the right sized mask you should then be able to gently hold it on with index finger and thumb and find bag-mask ventilation is easy (or in the spontaneously breathing patient that the bag moves freely). More often than not in smaller kids you don’t even need your little finger behind the angle of the jaw.
What I tend to find is that if I let that little finger roll back even a little it’s easy to compress the soft tissues of the neck, which is enough to occlude the airway.
The real message to take away is that in these smaller kids, it shouldn’t be a wrestling match.
Did I do better?
LikeLiked by 1 person