
Sometimes the really basic stuff needs better coverage. This series will probably start popping up a bit because sometimes it’s good to get people to share the stuff they wish someone said at the start. Here’s Greg Brown with simple techniques that could make all the difference that we should definitely do well.
Here are two sayings you hear all the time:
- “Simple measures are lifesaving”;
- “I thought it was common knowledge”.
More and more we are discovering that only one of these sayings is true. Yes, some of the simplest clinical interventions are the highest yield, but there is nothing common about knowledge. Why is it then we don’t often talk about or pass on these lifesaving skills and knowledge? A lot of the time we all put it down to “if I know then everyone knows”.
So it is about time that we all started talking about these simple and or basic interventions that save lives (or at least minimise the mess we have to clean up at a later stage).
In this the first of an indefinite series titled “I wish I knew then what I know now” we will be looking at the simple yet effective tips and tricks that either:
- We wish somebody had taught us at Uni / college;
- Didn’t exist then but do now; or, (c)
- We are at risk of forgetting due to an abundance of modern technology.
So quieten the voice inside your head that is saying “I am a senior doctor / nurse / paramedic / rescue guru – what could I possibly learn about the basics?” and take up the challenge to continue reading and see if you know our little tips and tricks. Or maybe you’ll have some tips and tricks to send back our way. With any luck these posts will generate some healthy continuous improvement and discussions all about the patient. We might all be surprised what we’ll learn along the way.
Controlling the Red Tide
This is not a post about quelling a Communist insurgency. Basic haemorrhage control appears to be a dying art (no pun intended). The skill of haemorrhage control is used across all areas of healthcare whether you work as an immediate responder in the pre-hospital environment, as a paramedic or professional pre-hospital care provider, within an emergency department, ICU or wards of a hospital or simply as a relative or friend after hours.
However, our observations of many of the health care professionals and volunteers that we work with (or teach) indicate that the basics are not known and rarely taught these days. So let’s look at some – direct pressure and indirect pressure.
Direct Pressure
Direct pressure….it sounds simple enough, but how do you achieve this? Let’s use a simple laceration to a limb with venous bleeding as an example.
The standard approach to applying direct pressure will see many people reaching for a flat combine (or other blood soaky-uppy type device), placing that directly onto the wound and bandage away. What about when that bleeds through? Simple – repeat step 1 by applying a second combine on top and bandage away. What about when it bleeds through again? Easy – repeat as above. Right? Well, maybe not so much.
The problem with this process (that we have all been taught at some point) is that at no stage are you actually applying direct pressure to what is bleeding. This is not a criticism of the individual – rather, it’s a firm clue that perhaps there is an issue with the teaching.
To explain what is going wrong we ask you to consider a leaking garden hose. If your hose has a small leak in it, what happens if you place the palm of your hand down on the leak? The water oozes out underneath your hand – this is just like the flat combine being placed onto a bleeding wound (i.e. the blood leaks out the side).
Now, what if you were to walk up to your leaking garden hose and place a single finger on the hole – what would happen? Well, assuming that there is not massive pressure behind the leak then the leaking water would cease.
This is direct pressure in action. One needs to think about what it is you are actually trying to achieve with your bandaging technique – flat on flat with distributive pressure is different to direct pressure. You need to add a pressure device, and a simple solution is to add a small rolled up bandage on top of the first combine – placed directly over the source of bleeding – then bandage over that.
These images describe this as simply as we can (it’s much easier to demonstrate than describe):
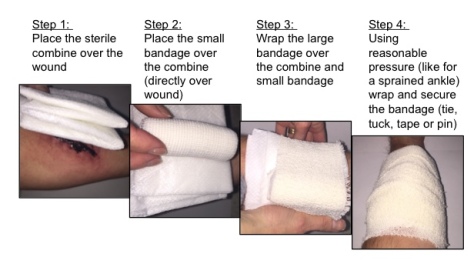
So simple to achieve when you think about it, and also very cost-effective.
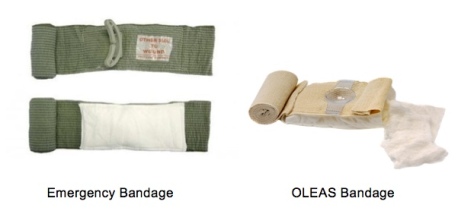
Now, there are also various commercially made bandages out there that achieve the same thing. Two that are widely used across our planet (well, certainly in Australia…) are “The Emergency Bandage” (aka Israeli Dressing, made by FirstCare) and the OLEAS Modular Bandage (made by Tactical Medical Solutions). If you have the ability to have these as part of your kit then these are great additions – they also do a lot more than just apply direct pressure, but that is a story for another day.
Remember though, big and flashy is not always needed to be effective. The main thing to remember with direct pressure is that smaller in this case is better. By this we mean that if you only need finger point pressure to stop the bleeding don’t use a combine as your patient will bleed more than they should; and let’s face it – once the blood has left the body it is damn hard to put it back.
Story Time
Many years ago I was working in a small(ish) country hospital when an elderly gentleman was brought in by ambulance. This gent had slipped on a wet pavement and unfortunately hit his head on the sidewalk whereupon he commenced bleeding from a nasty scalp wound.
A first aider from a nearby shop applied standard level treatment – flat combine and a crepe bandage. The ambulance team arrived shortly thereafter and, noting that the first layer was soaked through with blood, applied a second combine and crepe bandage then commenced transport to hospital. Believe it or not, the process was again repeated when the second layer had bled through – that’s three combines and three crepe bandages.
In the hospital the man’s dressings were removed and he was still bleeding from the wound. A single gloved finger was used to apply direct pressure and, lo and behold, three minutes later he had stopped bleeding.
One of the hospital staff then weighed the combined soiled dressings – the clot, combines and bandages weighed in at just under 800g. That is a LOT of blood what would have been better served remaining in the gentleman’s circulatory system.
Indirect Pressure
Indirect pressure is a great intervention that will stop (or at least slow) bleeding while we implement effective wound treatment. By this we mean you need to stop the blood spilling onto the ground while you apply the arterial tourniquet or pack the wound.
Indirect pressure is achieved by applying a compressive force proximal to the damaged artery until the bleeding stops (or is at least slowed down). There are in essence two methods of achieving this:
- Use of manual indirect pressure (e.g. a knee to the groin (femoral artery) or fist / knee to the elbow (brachial artery)); and
- Arterial tourniquets.
This Collective entry will only deal with the former; we’re keeping arterial tourniquets up our sleeve. Or somewhere.
So, manual indirect pressure.…again, it sounds simple enough. But how do you achieve this?
Many people are taught to simply apply some form of pressure to an artery above the wound. But, given that many first aid courses no longer teach the taking of pulses (for the international readers, within Australia a few years ago “first aid” seemed to become very cardiac arrest oriented, and we all know the presence or absence of a pulse no longer forms part of the CPR ritual for many people…) how can a first responder be relied upon to locate a brachial or femoral pulse in an exsanguinating patient when they’ve never been taught?
It is not just the first responders who are at risk here. As healthcare professionals we need to be able to act reliably and instinctively in the presence of life threatening haemorrhage. None us were born with ultrasound-guided vision (patent still pending so back off), and if you are reaching for your favourite POCUS device to find that vessel then you are doing your patient a great disservice.
The money shot is to go for the joint – at least here the pulses tend to be more superficial – and apply pressure there. How much pressure? Lots, in fact as much as you physically can! Manual indirect pressure requires a lot of force. To be most effective one needs to use as much of their own body weight as possible. Don’t stop here though – there is a vitally important extra step to this technique that is not widely known.
If all you do is apply a compressive force to the area in which the artery lays you stand a very good chance of missing your target’s location and sitting either left or right of where the artery actually lies. To ensure that the artery is compressed we recommend adding a twist of the knee or fist after compressing in order to kink off all vasculature under where the compressive force has been applied. We call this technique a “Z Lock”. This helps ensure that you are going to stop (or at least slow down) the bleeding and buy yourself time to treat the actual wound or apply an arterial tourniquet (if warranted).
Press and twist. It makes a difference. Also those are the instructions for that ultrasound-guided vision device. Damn. Shouldn’t have mentioned that.
Summary
Direct and indirect pressure are powerful interventions that help minimise a patient’s blood loss. They are however often forgotten about during both teaching and application stages as we become more and more task fixated. So we challenge you to make these steps part of your training regimes when talking about haemorrhage control. Practice them or, as one of our former instructors used to say, “don’t just be good at the basics – be awesome at them!”.

Can you please elaborate on the “Z-lock” method. I think I’m following…you place TK and tighten until bleeding stops. You then externally or internally rotate the limb slightly to further compress the vessels? I did some google searching but couldn’t find any additional EBM, websites, videos, etc. Thanks!
LikeLike
Hi, the “Z Lock” is simply a technique that we advocate to help ensure maximum occlusion of arteries. Effectively, instead of just pressing down in the area where you believe the superficial vessels to be you are applying downward pressure (lots of it) and twisting. This aids by kinking the vessel(s).
If you find a willing test dummy, explain that this procedure is about to hurt (and, if male, ask them to relocate their “anatomy” to one side), drop your knee into their inguinal fold (on the OPPOSITE side – and do this slowly please lest you cop an uppercut to the face) then push your body weight down through your knee (again, slowly); you are now applying indirect pressure to their femoral artery. Or so you think. Note that I haven’t asked you to palpate the exact location of the artery. Are you actually on the artery?
Ask your willing volunteer if their toes are going numb (assuming that they are not screaming at you due to the pain of your body weight in their groin region). Now, twist your knee so that your foot is now across one of your volunteers legs – the vessels under your knee are now twisted too. This should assist in slowing down the blood flow beyond where you are applying pressure.
This technique is designed to be applied either whilst you are awaiting an arterial tourniquet to arrive or whilst you are applying a tourniquet yourself.
You won’t find this referred to as Z Lock on the net – it is a term of reference that we use, not a recognised medical procedure.
Sorry about any confusion.
LikeLike
What I gathered is while applying manual pressure to a vessel (using your knee, hand, ect to slow blood flow), after you compress the site you should then “twist” your hand/knee to kink the skin and subcutaneous tissue. Much like wringing out a towel, this adds additional compression around the vessels. Although I am curious if what you described would help decrease blood flow after a TK is placed.
LikeLike
Hi there, you have described the indirect pressure technique beautifully – I like the towel anaology. Mind if I use it?
As for the use of this technique, the intent of the blog was to highlight that whilst you are awaiting effective application of a TK you need to do something to reduce blood loss from the limb wound. If the TK is effective then proximal indirect pressure should be released (assuming that your TK is above the highest wound e.g. there is no junctional bleeding).
I hope this helps.
LikeLike
Great stuff. Knew about the pressure bandage but probably didnt apply it as well as I could. Today, applied with good effect in ED. Thanks!
LikeLike
That’s awesome, and the precise reason why this site (and other FOAMed sites) exist. Well done. It’s about sharing information – after all, it is all about the patient.
LikeLike
Reblogged this on code one single car.
LikeLike