So you’re out there somewhere and you really want to do a thing you think might help but you don’t have your standard kit. Can you adopt the lessons of Richard Dean Anderson and improvise? Mel Brown has you covered.
Okay, so I am guessing from the title of this post you have a good idea of my age….I am talking about the original MacGyver, not the new one. And for those of you that are too young to know who I am talking about…..MacGyver could improvise everything he ever needed from anything that was “just” lying around. I once saw him create an explosive device with little more than a pepper shaker and some foil wrapping off some chewing gum.
It is wonderful that we live in a world where most of the time we have access to all we need (and more), including our medical equipment. But what happens when you don’t have what you need (or don’t have enough of what you need) to treat your patient?
So in line with our series on “I wish I knew then what I know now” we are going to look at MacGyvering (improvising) arterial tourniquets and pelvic binders – two devices that we are all very familiar with (or if you’re not you can be if you go …
These easily reproducible techniques are certainly something I wish I knew about when I first started nursing…..and no, it wasn’t when Florence was around (although I am pretty sure she trained one of my lecturers).
Continuing with the History Theme
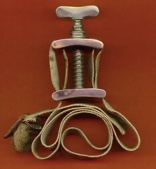
Did you know that arterial tourniquets have been around for a while now? In fact, the first combat commander to advocate the use of tourniquets was Alexander the Great – he based his decisions on the works of the medical researches at Cos.
However it wasn’t until 1718 that Louis Petit, a French Surgeon, developed a “screw device” that could be placed over blood vessels to stop flow. From the French verb “tourner” (to turn), he named the device “tourniquet.”
Elegant, non?
Improvised Arterial Tourniquets
One of the most important things to remember with any arterial tourniquet is that indirect pressure MUST be applied whilst the tourniquet is being applied. This will at least minimise if not stop the bleeding whilst the tourniquet is being applied…
Improvised tourniquets need to be at least 5cm wide to ensure adequate arterial occlusion can be achieved. Have you ever wondered why a shark attack victim that has had an improvised tourniquet applied to their bitten leg (usually via a surfboard leg rope) soon begins bleeding again after the bleeding was originally stopped? Well the theory goes that the initial narrow occlusion of the artery was enough to completely occlude the artery but as the pressure proximal to the point of occlusion builds up behind the narrow improvised tourniquet the arterial pressure is able to beat the tourniquet and the patient begins bleeding again. You need something applied over a wide area to get the job done.
So, what should we use? Firstly you need to find a windlass device that is thick enough and tough enough to withstand the pressure applied to it as you twist it to tighten the tourniquet (which can be up to 300mmHg of pressure). Some things (and only some, there would be more) that are readily available include:
A thick solid stick (not always ideal)
An indicator lever (probably not out of your own car)
A screwdriver
A tyre lever
A set of pliers
As for the tourniquet itself, what should be used? Some materials used with good effect include (but again are not limited to):
Triangular bandages (make sure these are the cotton ones and not the cheap paper ones)
Seatbelts (once again probably not out of your own car)
Canvas belts
Shirt sleeve (preferably with non-stretchy material)
Neck ties (not sure how many of these are around these days).
One of the issues with improvised tourniquets is the narrowing of the tourniquet at the windlass point. This can pinch the patient’s skin and make an already painful intervention more painful. The narrowing of the tourniquet material can also lead to greater damage to the underlying skin, muscles and nerves. Having said that I am not sure the alternative of death due to blood loss is ideal either.
I think many of us have spoken about how we could improvise an arterial tourniquet….but how do we actually do it? Let’s use the triangular bandage as our improvised tourniquet to discuss this in detail.
Ideally you want two triangular bandages – lay the first one along the arm or leg.
Wrap the second triangular bandage over the first and around the arm or leg and tie a knot or two.
Place the improvised windlass rod on top of the knot and tie two more knots to secure that windlass (note: if you can’t tie knots, tie lots).
Turn the windlass until the bleeding stops and then turn once more. Secure the windlass in place with the first triangular bandage.
If you forgot the first triangular bandage you can use gaffer tape (or equivalent) to secure the windlass in place.
It is important to still write “T” and the time of application somewhere obvious (maybe on the patient’s forehead would catch the eye) as you would for any arterial tourniquet. Obviously improvising is not ideal when compared to commercially available products. However, they are life saving for your patient when you don’t have the equipment that you need available.
Improvised Pelvic Binding
Improvised pelvic binding has been widely used throughout Australia by our Ambulance services for a very long time – I think most people would be familiar with pelvic sheeting. There’s some nuance around when pelvic binding may or may not be useful (just check out the posts here, here, here and here) but what do you do if you’ve made an assessment it is worth trying and you’re without your fancy gear?
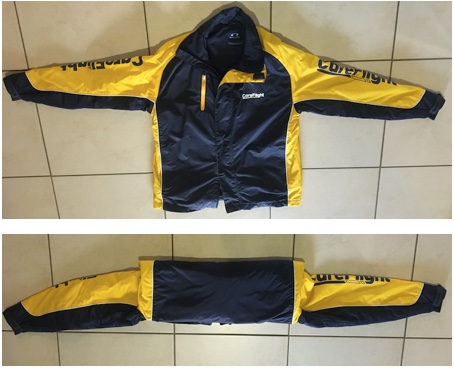
Well we all go driving or hiking with sheets in our car boot (that’d be a trunk for our North American friends) or backpacks, right? I don’t think so, and I know I certainly don’t. So what do we commonly have on us that we could use? A jacket works well as an improvised pelvic binder. Let’s have a look at what this looks like:
Prepare the jacket for use. Use the arms as a width guide and fold it up like so.
Place the jacket under the smalls of the knees where there is a natural hollow.
Preferably with two operators seesaw the jacket up to the correct position over the greater trochanters.
Bring the arms of the jacket together and tie a knot.
Twist those sleeves until the required pressure is achieved.
Secure that knot (gaffer tape works again, or zip ties or equivalent).
You’re done. And maybe cold, but done.
Once again it is obvious that improvising is not ideal when compared to commercially available pelvic binders. However they are life saving for your patient when you don’t have the equipment that you need available. All interventions, whether improvised or not, must be continually checked for effectiveness – especially if your patient is moved.
Summary
It is important that as clinicians we understand how to use the commercially made equipment we have available to us. However, it is just as important that we know how to improvise life saving interventions as there will be a time when we won’t have our equipment (or enough of it) to treat our patients. This is a predicament that I certainly don’t want to find myself in. So let’s share what we know as shared knowledge is power. Or share what MacGyver knows because that is also power.
A bit more reading:
Those posts on arterial tourniquets and bleeding are here.
The third and final instalment of this series has been a while coming. Nothing to do with being tactical just because “reasons”. Here’s Mel Brown following from part 1 and part 2 with, yes you guessed it because of precedent and it was written at the top there, part 3.
In part one of this series we looked at what tactical medicine is, some of the history of tactical medicine (both military and civilian) and the three preventable causes of death within the tactical environment. In part two we looked at some of the models of infiltration for medical teams, specifically the “whos, hows and whats” of this topic. Now in part three we will look at the three phases of care as set out by the Committee for Tactical Emergency Casualty Care (C-TECC).
Not just “what” but “when”
Medical intervention is vital to saving lives in the tactical environment as 90% of tactical deaths occur prior to the casualty reaching a medical treatment facility. However, these interventions must be performed at a tactically appropriate time otherwise more injuries may be sustained and potentially more lives potentially lost. This is why the three phases of care (as set out by C-TECC) guide when certain interventions should be attempted.
Conventional EMS protocols don’t account for unsecure or high threat scenes and are solely patient focused without any acknowledgement of the surrounding operational or tactical constraints other than to assess for danger during the primary survey. This is why the C-TECC guidelines were developed; they guide patient care whilst taking into account the operational requirements of a high threat environment.
C-TECC guidelines should be seen as “guiding principles”; they are not rigid or inflexible like some current civilian EMS protocols. The three phases of tactical care are dynamic, often overlap and rarely work in a linear or isolated fashion. This is why it is so important to have a clear understanding of each phase so that fluid movement between phases is possible.
The Three Phases
There are three distinct phase of care within the tactical environment that guide which treatment should be applied when. The three phase of care are:
Direct Threat Care
Indirect Threat Care
Evacuation Care
For those of you with a military background you may be used to these three phases being called:
Care under Fire
Tactical Field Care
Combat Casualty Evacuation Care
C-TECC changed the titles of each phase to ensure that they could be easily used in all high threat situations within the civilian setting. A high threat situation is not just the kinetic one (active shooter, blast) but includes building collapse, multi-vehicle accidents, natural disasters or even the rapid advancement of fire.
Let’s dive in a little deeper.
1. Direct Threat Care
The direct threat care phase exists whilst there is a continued threat directed towards both casualties and other personnel and the risk of further injuries and / or deaths is very high. Treatment during this phase is focussed on minimising further harm, accomplishing the mission, neutralising the threat and stopping catastrophic haemorrhage. There are minimal medical interventions delivered to the casualty in this phase. This is a foreign concept to most medical personnel.
The medical care provided in this phase is limited to controlling extremity haemorrhage and removing the casualty from the point of injury. This care can either be delivered via self-aid or buddy-aid. If the casualty is able to self administer first-aid then this should be encouraged so that the medical responder can care for the casualties that are unable to treat themselves.
A big part of the care in this phase may be simply assisting the casualty to a point of cover; after all, the casualty should never (look maybe that should be in capitals because never, never, never) be treated in an exposed area. Don’t treat on the street. It is important to think about the choice of cover….good concealment doesn’t always equal good cover.
Early haemorrhage control is critical in tactical medicine as it accounts for the largest statistical group of preventable deaths. The C-TECC guidelines recommend rapidly controlling extremity haemorrhage in this phase and this usually defaults to the application of an arterial tourniquet. It is important to remember that any medical interventions in this environment need to be balanced with operational risk. This means that sometimes we can’t provide all the care we would to our patient it we were in a non-tactical environment.
Applying a windlass arterial tourniquet can rapidly, easily and effectively treat extremity haemorrhage. There are two such arterial tourniquets widely used in Australia and approved by the TGA – the SOFFT-W and CAT (and remember that first post in the series had a bit on tourniquets). Be aware that the latest CAT is a generation 7 and has some differences to the generation 6 – equipment familiarity is a must.
The arterial tourniquet must be applied as high as possible on the limb and over clothing as it is tactically unsound and time consuming to remove clothing to look for all wounds on the extremity within the direct threat care phase. The aim of treatment within this phase is to keep the blood where it needs to be! In simple terms if you don’t keep the red stuff on the inside then you may as well not bother with anything else as the best blood for the casualty is their own. Don’t forget to mark your casualty’s forehead with the universal sign for an arterial tourniquet, that being a “T” and the time.
Direct pressure should be considered if the environment allows it or if the casualty can apply direct pressure by him or herself. Applying effective direct pressure is time consuming and reduces the medic’s ability to treat multiple casualties. Haemostatic dressings are not considered in this phase and are deferred to the indirect threat care phase, as they require time to work (3 – 5mins of continuous pressure). This is why arterial tourniquets are seen as the most effective and rapid intervention for extremity haemorrhage within the direct threat care phase of the tactical environment.
The only other brief consideration in this phase is to airway. Put simply, this means that you may place the casualty in the recovery position when moving them to a safer position but only if it is tactically appropriate to do so and can be rapidly achieved (this is not a formal assessment of airway – it is simply positioning).
2. Indirect Threat Care Phase
The indirect threat care phase evolves once the responder and the casualty / casualties have moved to an area of relative safety. This relative safety may be provided by structures such as a wall, building, car etc. or by the presence of a tactical security force. Either way the tactical medic must maintain situational awareness whilst treating the casualty / casualties as the environment is dynamic and can change back into a direct threat situation rapidly and at no notice. Always be prepared to move instantly…..this means do not open all of your pack up and spread it out!
In some situations consideration must be given to the disarming of casualties, both friend and foe. If the casualty is unable to sufficiently control or secure his or her own weapon then the medic needs to render the weapon safe and remove it from the casualty. This action is paramount if the casualty is showing signs of altered mental status or head injury. This helps ensure the safety of you, other personnel and the casualties.
If there are multiple casualties then the tactical medic needs to complete a rapid triage that will sort the casualties into three simple groups:
Uninjured and / or capable of self-extraction
Deceased / expectant
All others
The uninjured or capable of self-extrication group should be encouraged to self-aid. This group (if able) may also assist in applying first-aid to other injured casualties. The deceased / expectant group should (if tactically appropriate) be placed away from the core group of casualties that are receiving care.
The “all others” group should be assessed using the C-ABC acronym (Catastrophic haemorrhage – Airway, Breathing & Circulation). The casualty / casualties need(s) to be reassessed to ensure that all interventions performed in the direct threat phase are still effective and needed as well as assessing for any unrecognised haemorrhage.
Removal of clothing and protective equipment should be kept to a minimum. However, the tactical medic needs to ensure that life-threatening injuries are not missed. Therefore, they must check under clothing, body armour etc. and ensure they inspect the casualty’s back.
Because body armour and clothing should not be completely removed (it is required in order to provide continued protection for your casualty) the casualty should be assessed for further injuries by firmly raking the whole body. When assessing under body armour only unclip one side of the armour and lift up (don’t completely undo or remove). Raking allows for identification of unseen wounds as the fingers will fall into divots due to the firm pressure being applied.
Haemorrhage control within this phase may include:
Direct pressure methods (an emergency bandage is useful for this);
Tourniquets for undiagnosed extremity haemorrhage; and,
Haemostatic dressings for non-compressible haemorrhage.
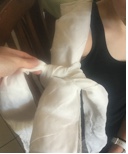
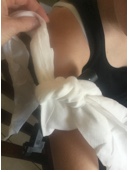
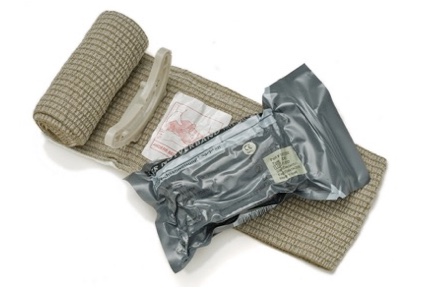
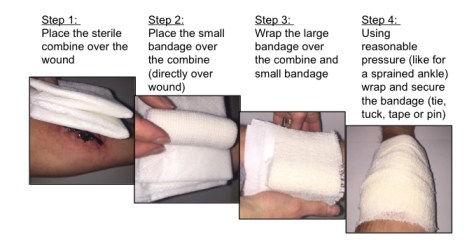
The emergency bandage is a useful tool within the high threat environment as it can be applied rapidly and ensures direct pressure is applied to compressible haemorrhage (See the picture below). The combine found within the bandage has a rumoured capacity of 400mL (note: our experience is closer to 250mL – which is still a lot!) and the pressure device can apply up to 13.6kg (30lbs) of pressure onto a wound.
Probably a pretty effective way of soaking up spills around the house too.
If you don’t have such a device available or you run out of resources it is extremely simple to improvise this device by following the four steps below:
For further information on direct pressure methods you could link at the post that is totally on that right here.
Haemostatic dressings are an effective method of controlling non-compressible haemorrhage, compressible haemorrhage not amenable to tourniquet use or as an adjunct to tourniquet removal (if evacuation times are anticipated to be prolonged). Currently there is only one haemostatic dressing approved by the TGA for use in Australia, this is called QuikClot Combat Gauze.
QuikClot Combat Gauze is impregnated with kaolin, an inert mineral found in some clay, specifically clays from tropical areas. Kaolin is a potent activator of contact (intrinsic) clotting pathways that accelerates the initial onset and speed of clot formation. Further information on QuikClot and its use will be available on the Collective as part of a future post of the ongoing series titled “I Wish I Knew Then What I Know Now!” If you want information sooner our Education team would be happy to share its one page handout – contact them by leaving a response to this blog.
What about the Airway?
Airway management in the high threat environment must be high yield and take minimal time to implement. That means the intervention might be as simple as applying a jaw-thrust or positioning the casualty to open the airway. The position chosen for the casualty (recovery or seated position) will depend on a few things, some of which include:
The current tactical situation (this has a massive impact on what position may be used for anyone as it may not be safe to sit your patient upright).
The conscious level of your casualty (unconscious vs conscious but with airway concerns).
The only piece of plastic that is considered in the high threat environment is a nasopharyngeal airway (NPA). NPA no longer has the contraindication of basal skull fracture…..believe it or not. It is now considered a relative consideration when basal skull fractures are suspected (or known). I put to you that the reason why one or two have been caught on CT or x-ray in the wrong spot is purely and simply due to poor technique. The best tip I can give you here is aim in the direction of the ears NOT the eyes!!!
NPAs are far more useful than Oropharyngeal Airways (OPA) in an overwhelming situation where you are unlikely to remain solely with one casualty. NPAs allow for airway support through all stages of unconsciousness to consciousness, unlike the OPA that will be spat out by the casualty as soon as their gag reflex returns (but not always with a return of complete airway control by the casualty).
And getting on to breathing …
Assessment of breathing cannot always (actually put it in the “rarely” category) be done through the traditional means most healthcare professionals are used to in the hospital setting. The ability to listen to breath sounds is diminished considerably due to noise, protective gear (body armour, clothing) etc. and the fact that an ongoing tactical situation is likely to be noisy. Therefore, it is important to remember to use your observation skills and sense of touch. Assess the quality of the chest wall movement – is it equal, does the left side look the same as the right side, is it moving as you would expect?
It is important to assess the casualty’s chest and back thoroughly. This is the only way you can be sure that there are no open chest wounds or obvious chest injuries. So make sure you lift up body armour then look, feel and rake firmly to ensure you don’t miss any injuries!
If during your assessment you find an open chest wound it is important to cover the wound with an occlusive dressing. The general rule of thumb is any wound between the umbilicus and the shoulder should be covered with an occlusive dressing. There are many commercially made chest seals on the market (e.g. Ashermans, Halo, Russel etc.) or you can used improvised ones – one improvised seal that is usually readily available is defibrillator pads. No matter what you use, just make sure it sticks and that you have cover both the entry and the exit (if there is one) wounds.
An important point to remember is that even if you use a vented seal, it is likely to clog up with blood or fluid quickly. This means it will lose its ability to allow air to escape from the casualty’s chest. Therefore, it is a useful to get into the habit of checking for signs of an increasing pneumothorax regularly even if you use a vented seal. If the casualty starts to display signs of an increasing pneumothorax it will be necessary to “burp” the biggest chest wound. This is achieved by manually forcing air out of the chest by compressing the rib cage (with the seal removed enough to expose the wound). Once the air has been manually expelled replace the seal whilst the downwards pressure is still being applied.
The only invasive intervention considered here for a breathing problem is that of needle thoracocentecis (or decompression). There is no time nor should there be any consideration given to more advanced interventions (e.g. finger / tube thoracostomy). Always remember the indirect threat phase can quickly and without warning return to a direct threat phase.
Casualties who fall victim to penetrating or blast injuries that do not exhibit signs of life are most likely to have exsanguinated, or “bled out”. In these cases commencing CPR is unlikely to revive the casualty as the most likely cause of their cardiac arrest is insufficient circulating blood volume – compressing the heart will not circulate blood if there is no blood left.
This is not a hard and fast rule though – if this casualty is your only casualty and the tactical environment permits then it may be in the best interests of your team and bystanders to be seen to be doing something for the casualty. Furthermore, if your medical team is immediately available and possesses appropriate resuscitative equipment (such as the ability to “plug the hole” and perform a blood transfusion) then the commencement of CPR may be warranted. Again, C-TECC produce guidelines, not rules.
Always remember to reassess your casualties as frequently as possible. It is important to rapidly acknowledge the deteriorating casualty and to ensure that all interventions performed remain both effective and necessary. Once the environment starts to settle it is important to consider documentation (this may be as simple as writing on the casualty in permanent marker) and packaging the casualty as they will require moving to an evacuation point at some stage.
Some Notes on Triage and Organisation
Triage in these overwhelming situations needs to be simple and understood. You will not have the cognitive ability to follow complicated processes in this environment. There are many systems of triage in existence. In the presence of a mass casualty situation the CareFlight triage system has been assessed as being a simple yet effective method (as it effectively triages both adults and children). This system has been adopted by many agencies around the world including certain militaries (who shall remain unnamed, you’ll just have to trust me there).
The CareFlight Triage system is a simple system that can be used by people with minimal training to determine whom should be treated when. If casualties are able to walk (this is walk, hop or crawl) then it can be assumed their ABCs are all satisfactory (at least for the time being) and they can wait or even be transported in groups by simple means (e.g. bus) to a staging area / hospital. To put it bluntly, if you can walk then you have reasonable perfusion, irrespective of your injuries.
Casualties who do not obey commands and don’t breathe when their airway is opened are deemed unsalvageable in this setting. However, remember that this only applies when resources are overwhelmed; if you have a single casualty then you may consider continuing full active treatment.
If the casualty is requiring airway manoeuvres for them to breathe or have no radial pulse, suggesting poor perfusion, then they have the highest priority for treatment (i.e. immediate). The other group of casualties that cannot walk, but can obey commands and have a radial pulse should be treated as soon as possible (i.e. urgent). See below for the CareFlight Triage – Mass Casualty Card.
Experienced TEMS personnel have found that a lot of time is being spent on the re-triage of deceased casualties. Some injuries in the light of reflection are easily seen to be non-consistent with life, yet in the tactical environment people will re-triage these casualties many times. Therefore it is important to consider positioning the deceased casualty in a respectful yet distinctive position (that all personnel know as the sign for deceased) to indicate they have been assessed and are considered deceased.
The position recommended by Threat Suppression in the USA is to place the casualty on their back, legs crossed at the ankles, arms straight up (above head) with wrists crossed. This will help ensure the casualties that require treatment and that we can potentially save are assessed as quickly as possible.
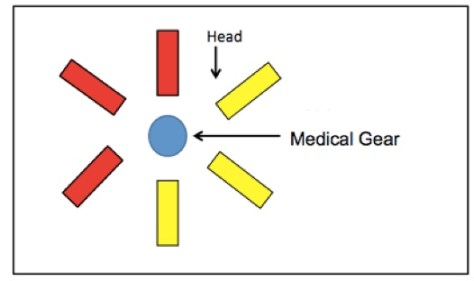
If you are involved in setting up a Casualty Collection Point (CCP) then it is important to keep your casualties and equipment together. This minimises time wastage and allows for easy access to both the casualties and resources. It is important to ensure that you think about setting up in a protected area which gives you easy egress (escape) points as well as allowing you to maintain a good visual of any threat entry point. Here are two set-up examples:
There’s not a single solution but the principles stay the same
3. Evacuation Care Phase
This phase of care takes place in a safe location removed from the tactical environment. In theory, once the casualty is loaded onto the evacuation asset or moved to the pre-staged evacuation point they should be departing the scene of any threat.
Prior to commencing the evacuation all previously performed interventions should be reassessed and, where required, bolstered. Good packaging of the casualty here is vital to ensure all interventions remain insitu.
Spinal immobilisation is becoming more and more controversial as more reviews of the literature come out. Some services no longer place cervical collars as they don’t immobilise the neck effectively and make airway control difficult. However, consideration of spinal injuries should still occur and the casualty should be packaged appropriately (in accordance with local practice) for these injuries.
More resources should become available during this phase. There should be an increase in:
Personnel (medical, logistical, tactical)
Equipment
Medical supplies
Other considerations include: large bore venous access or intraosseous access; further assessment and administration of analgesia and fluid replacement; and if prolonged holding or transport times are expected then consideration may be given to the administration of antibiotics.
It is important to remember in this phase that only interventions that are needed should be performed. If the casualty does not need a chest tube then they should not receive one just in case. These unnecessary interventions will lead to a choke point within the flow of care and will delay casualties getting to where they need to go – the hospital!
The Summary
In broad terms, casualties in a tactical environment will fall into three categories:
Casualties who will live regardless,
Casualties who will die regardless, and
Casualties who will die from preventable deaths unless proper life-saving steps are taken immediately.
The guiding principles of Tactical Emergency Casualty Care exist for the purpose of eliminating preventable deaths. Remember never “treat on the street” and that the right procedure performed at the wrong time or place might result in further casualties, injuries and death. If all we can do is treat extremity haemorrhage (tourniquets) and tension pneumothorax then up to 94% of preventable deaths may be avoided.
Notes and References:
Here’s a few of the more useful references you’ll find out there.
Managing the airway in prehospital and retrieval medicine is a challenge and has inspired many a discussion in many a setting. And anyone working in the area would appreciate the additional challenge when there’s lots of blood getting in the way. As a result everyone has tips and and tricks to try and manage things.
This is by no means the first time people have come up with an approach (or shared an approach) but in the spirit of wide-ranging discussion, here’s a suggestion from Dr Alan Garner recorded for posterity in video.
It runs for about 10 minutes and you’ll note that at the end there’s an update as the approach evolved.
All thoughts, feedback and experience very welcome.