Category Archives: Practical Things

Making Things Clot

It’s been a solid break but here is Andrew Weatherall returning with a bit about just one approach to getting access to plasma in the field. 

In prehospital medicine there aren’t really many limits to what we can carry. Ultrasounds are routine. Intubation gear is boring. We even carry patients some of the time.

Plus since 1987 we’ve carried red cells for transfusion. Which is excellent. And we’ve used plenty. Sometimes though you want to change things up and changing things takes time. Like say, changing what you carry for transfusion. Which only took us 30 years or so.


How you get it done…

Us carrying red cells has been reality through a range of different attitudes to transfusion. Where we find ourselves now of course is thinking that if you need fluids in the setting of trauma then the fluid should not be see through. For a while though we’ve been trying to figure out how to extend beyond red cells.

The thing is that now that we know that acute traumatic coagulopathy (ATC) is a thing, and we’ve known that for a pretty decent amount of time now, you need to be wrestling with how to try and deal with the coagulopathy bit, not just dish out the vampire-sating stuff.


So what to use…

If you go to look at the literature, for a while there’s been plenty out there saying that fibrinogen might be a useful thing to go with. So we’ve been waiting a while for freeze-dried cryoprecipitate but last time we looked it came out as a little bit pricey for our taste but there was something more significant.

Time.
djim-loic-69263-unsplash
Blurry, blurry time.

The more significant thing for our work profile was just the fact that preparing FCCs takes a bit of time and would probably take a team member out of action for too long. That might be a different story if we were doing retrieval or more remote pick-ups, but for metropolitan responses it just didn’t quite seem to fit.

So we kept giving the red cells. Then when TXA gained some evidence, we added that. That one’s quick.

Trauma centres kept publishing on the role of viscoelastic testing but that didn’t fit our work profile either. So we were stuck there.

And whole blood was not on the table in our neck of the woods.

It kept nagging at us though. What’s the other thing we should be giving?

Which is why we went to chat to a clever person at the place we pick up our blood.


The Ideas Bank

At this point something we’d discounted as an option suddenly became an option. Plasma.

It just hadn’t seemed like an option for us because of the issues around thawing time and the need to use it within 4 hours. That’s not true anymore though. Extended life plasma (ELP) is now available and is OK to use for 4 days after thawing. Add that to some evidence that group A ELP is suitable for use as a donor unit in the adult patient population (rather than having to always use group AB) and our blood bank contact had come up with a plan to do something different.

So this was the plan:

  • Switch what was in our blood esky from 3 units of O- red cells to 2 units of O- red cells and 2 units of group A ELP.
  • At the end of the shift (this operation is running one shift per day), return the products as usual to the blood bank.
  • The ELP can then go back into the pool used by the hospital blood bank.

And we figured we’d start the plasma early, maybe after the first lot of red cells.

There were to be some limits of course, particularly when it comes to kids. Try as we might, we just couldn’t find guidance for kids under 11 to see if group A ELP alone would be appropriate. Same story for the paeds haematologists. So kids were out.


The Introduction

The whole thing got moving within a few short months and the plasma hit the esky in April. It was introduced with lots of discussion and education and an undertaking to keep track of the results.

 It really was seamless. We just sort of needed the evidence to back up the expert advice of the haematologists.


Catching Up

And this is where another bit of fortuitous timing worked in our favour. A trial came out.

PAMPer reared up in the NEJM showing a very solid difference in mortality in those given plasma in the prehospital phase. This was patients between the age of 18 and 90 and with evidence of haemodynamic things that matter – systolic blood pressure under 90 mmHg (or a single reading hitting 70 or below) and heart rate above 108/minute. 5 minutes of being arrested was also enough to get a number of people kicked to the side.

It’s also worth mentioning that they just gave their 2 units of plasma in their entirety. Some of the centres were carrying red cells so if they were being treated as recruitment centres administering “standard” resuscitation for a particular day, there was a total of 13 of the 27 centres who might go ahead and give some red cells.

A total of 501 participants were eventually randomised. 30 days after the patients were randomised the number of deaths in the standard care group was 89. This is significant compared to the 53 deaths in the plasma group. After regression analysis, those in the plasma group had a risk of death 39% lower than standard care. There were also mortality differences at 24 hours and in the “in-hospital” cohort.

As a bonus, patients in the plasma group received fewer units of blood components overall. Plus they had no documented cases of transfusion-related lung injury during the trial.

So that was enough to make us tweak things a little more and consider the plasma as our first line resuscitation in most instances, followed by the red cells.


What makes it work?

So for now this solution works in our context. That’s not to say it would work for everyone or would be the best choice for different work profiles. We note that London’s excellent HEMS service has just recently introduced bags with both red cells and FFP in them and that’s a different approach again which will be worth watching. And even more recently the crew from Kent Surrey Sussex Air Ambulance Trust have published a retrospective study sharing their success with freeze-dried plasma.

It’s also not to say we won’t seek to tweak things in the future. There are a few key things that made the use of ELP work for us:

  1. Local experts

There’s no doubt that the ‘who you know’ factor helped in setting this up. Being able to approach the local expert, in our case Dr Leo Pasalic (full credentials below), who could think laterally when we approached with a query opened up an avenue we had dismissed. Leo was also able to place it in the context of a broader understanding of the literature. There’s no literature search that’s a replacement for long experience and cultivated expertise.

  1. A very excellent blood bank

A nearby blood bank that supports that expert person with great service is a pretty crucial part of the mix. As clever as Leo is (and he is pretty clever), the whole plan hinges on other clever people who pull off the ‘let’s make this happen’ bit and have that extra understanding of the science and logistics. For us those other key people were Dr Kifah Shahin and Hayley Keenan (you should check their full credentials below too). From the time of deciding to do this to actually carrying the ELP was weeks at most and the logistics have never been an issue. They added the packs and made it work.

  1. Reduce, reuse, recycle

When giving blood products we are, naturally, also trying to nourish our inner greenie. I mean, as it is we’re aiming to reduce the overall usage of blood products throughout the admission. We also want to make sure we’re not thawing the ELP and not being able to use it. Blood products are a precious resource and the cost of production is also high. To date, not a single unit of ELP has gone unused. It’s thawed for the prehospital service, returned at the end of shift and invariably used well within the permitted timeframe by the very big hospital for other patients.

gary-chan-351213-unsplash
This is a terrible place for blood products to end up.
  1. The follow-up plan

The plan for tracking the experience of use is already in place so we can confirm our local experience with this new option. Trial evidence is great but ongoing real world monitoring has to come with the territory.

We’ve come a fair distance from our early forays into prehospital blood administration which involved the side of a road, a hospital somewhere nearby and police doing high speed runs to deliver those units.

It’d be good if the next step took less than 30 years though.


Notes:

Before we get into the references, we would really like to acknowledge the support of the NSW Health Pathology through their Blood Bank at Westmead Hospital and the brilliant staff working there.

Dr Leo Pasalic is a staff specialist in laboratory and clinical haematology and transfusion medicine and gets to cover the medical supervising responsibilities at the Blood Bank at Westmead Hospital.

Dr Kifah Shahin is the Transfusion Lead Scientist for the West, Rural and Regional laboratories in NSW Health Pathology.

Hayley Keenan is a Transfusion Senior Scientist at NSW Health Pathology Westmead.

That Blood Bank they work at is part of the Department of Haematology at the Institute of Clinical Pathology and Medical Research, NSW Health Pathology, Westmead Hospital. The hospital has been on that location for 40 years. The ICPMR got there first, having been on the site for 41 years.

Now, the reading list.

Here’s the link to the PAMPer thing again:

Sperry JL, Fuyette FX, Brown JB, et al. Prehospital Plasma during Air Medical Transport in Trauma Patients at Risk for Hemorrhagic Shock. New Engl J Med. 2018;279:315-26.

This isn’t the only story out there of course. The paper from Moore et al is worth a look.

Moore HB, Moore EE, Chapman MP, et al. Plasma-first resuscitation to treat hemorrhagic shock during emergency ground transportation in an urban area: a randomised trial. Lancet 2018;392:283-91. 

And that Kent paper again:

Oakeshott JE, Griggs JE, Wareham GM, Lyon RM. Feasibility of prehospital freeze-dried plasma administration in a UK Helicopter Emergency Medical Service. Eur J Emerg Med. doi:10.1097/MEJ.0000000000000585

Now, some others:

Winearls J. Fibrinogen in Traumatic Haemorrhage: A Narrative Review. Injury. 2017; 48:230-42.

Lance MD, Ninivaggi M, Schols SEM, et al. Perioperative dilution coagulopathy treated with fresh frozen plasma and fibrinogen concentrate: a prospective randomised intervention trial. Vox Sanguinis. 2012;103:25-34. 

Schöchl H, Nienaber U, Maegele M, et al. Transfusion in trauma: thromboelasfometry-guided coagulation factor concentrate-based therapy versus standard fresh frozen plasma-based therapy. Critical Care. 2011;15:R83. 

Shackleford SA, del Junco DJ, Powell-Dunford N, et al. Association of Prehospital Blood Product Transfusion During Medical Evacuation of Combat Casualties in Afghanistan With Acute and 30-Day Survival. JAMA. 2017;318:1581-11. 


A Quick Look Back at 2017

Well everyone else is doing the “look back, look forward” thing, so why not us as well?

It’s that time of year. You know, the one where we just want a few more days to kick back and relax or enjoy a southern hemisphere summer. What better way to look busy than a review of the posts that got the hits in 2017? Ssshhh. There may well be better ways but this is what we’re going with.

First up, music for the ears

Podcasts. People do them and people listen to them. Clever people do them regularly. We are not that clever it seems. We did finally get around to putting up a couple this year though and the most recent one was very comfortably the most popular podcast we’ve done. OK, it’s a field of four but it’s not nothing.

The podcast features Dr Blair Munford. Blair has been in the retrieval and prehospital field since the mid ’80s. He has stories. Lots of stories. This story is his though and in it you get to hear a little about what it’s like on the day you’re getting picked up by the helicopter. So maybe have a listen. Lots of people obviously thought it was worth it.

The Not Very Final Countdown

We’re not packing up or anything so it’s nothing like a final countdown, but is there a theme amongst the posts that people seem to click on the most? Well let’s see. Here are the 10 top written posts through 2017:

10. This is how he does it

Coming in at number 10 is a post from a new contributor, Dr Shane Trevithick. This one is a great example of someone describing where experience has led them when they’re looking after a patient for retrieval.

9. Tactics for hostile places – Tactical Medicine still going strong

The series on tactical medicine dates from 2016 but still gets plenty of interest. The third instalment just keeps clocking up the hits (and provides an easy link to chapters 1 and 2). People just want to know about phases of care I guess. If you like that you might also find this conference update worth your time too.

8. An old classic – little kid RSI

A couple in the year’s top 10 were all about kids which is a pretty pleasing thing. The care of kids isn’t just about shrinking stuff from adults and there’s plenty to gain from being kid friendly. This post went over the reasons that the approach to RSI in kids has changed and what we should be trying to focus on.


7. Necessity and the mother of invention

As much as we like kits sometimes you have to be flexible. This post on how to use what you have when you just have no choice is designed for when you’re stuck in one of those moments that will make you thank your gods for your real equipment when you’re back on a real job. Tourniquets? Check. Pelvic binding? Check.

6. Holding the line

Could there be a practical theme emerging here? This post covers a simple thing that you can really use – a way to keep that IV line in no matter what the world tries to pull it out.

5. Sucking and blowing and the pleural space

Did you feel like this list didn’t have enough physiology in it? Alan Garner’s post covering pressures and the pleural space is a really interesting revisit of something we all ‘know’ from way back when.

4. Kids and drips

This practical post on putting cannulas in little people certainly grabbed some interest. Maybe it will help out next time you’re facing a procedure that can cause pain at both ends of the needle.

3. More physiology when you pick a person up

This post comes from 2016 as well but it just keeps people coming up. A topic not covered that much elsewhere, but the physiology of a patient being winched is certainly relevant to lots of people in the  rescue space.

neil-thomas-330134
We’ll level with you the rescuee here is apparently a mannequin so the physiology would be pretty forgiving but you get the idea.

2. In a bind

What is it about pelvic binders that gets people coming back for more. Our long running series on pelvic binders got a boost with number 5 which covered a case where the binder really probably didn’t help. You could drop by and end up down the rabbit hole of the other 4 posts with those links at the start of it.

1. Back to basics

And the top spot for 2017 goes to one of those great posts that covers things we often think of as basic but which might just make the biggest difference to patients – “basic” airways and adjuncts. Maybe you’d like to drop by this edition of those things we wish we’d known way back when we started.


So that’s the list. And the theme is pretty clear. People like practical things. And physiology. And things about kids. And things that touch on the literature. And … actually people probably just like all things prehospital and retrieval. Better get back to it.


Notes: 

The image from unsplash.com was posted just like this by Neil Thomas.

Simple Systems for Getting Things Done in Retrieval

Well this time around we welcome a new contributor. Dr Shane Trevithick is a retrieval doctor with many years experience covering prehospital, interhospital and coordination work when he’s not being an emergency doctor. He’s got a bit on simple systematic approaches that get the job done. 

One of the exciting things that practicing medicine out of a helicopter does is make you a “Rock Star” of the medical world.  Your colleagues and the general public are amazed by your method of arrival on scene, the ensuing dramatic interventions, the sexy uniform, your appearance on the evening news and your general confidence back in the hospital when you can manage dramatic medical problems which seem much easier when they are not trapped upside down in wreckage.

The problem with being a Rock Star performing in a band is that to continue being the Rolling Stones of Medicine [Ed: we would not suggest this reference is in any way a sign of author age] you feel compelled to keep releasing new albums regularly.  This can be a problem, especially with social media, as developments in medicine do not keep pace with the need to tweet and podcast and you are at risk of grabbing the latest study or technique involving patient plumbing and announcing this to the world as the next big thing in the world of Helicopter Rock Band Medicine.

This does tend to mean that you can gloss over some of the basic things which really make a difference to your medicine and your patients. Just like a Rock Star will be completely familiar with the basic things that makes playing their instrument possible, it helps if you can really nail the basics.

So here are a few tips that work for me to do a better job as a retrievalist in whichever team I’m working in.
Have a Plan

A good plan when you approach a patient makes a big difference, especially for an interhospital retrieval. This makes a huge difference to the smoothness of how your retrieval will flow and reduces your risk of making an error by omitting something.  This is a bit like having a checklist but I don’t quite use it like that because really a checklist involves a bit of call and response.  It’s not quite a strict list, more like having a systematic approach to reduce the risk of error.  If you have the same pattern to how you do things you get much quicker and slicker and you are much less likely to miss something.

It took me a lot of years to work out I didn’t have a consistent system.  And when I analysed some the mistakes and complications I had I realised they came about because, like a good anaesthetic registrar would, I modified what I did to fit the Paramedic I was working with, rather than communicating a system that would ensure I didn’t miss things.  If I had actually had any system to do the job myself then I would have avoided a lot of problems.

So here’s the system I created for myself. It might work for you, or might just prompt you to think through what system would work best for your brain.

OLYMPUS DIGITAL CAMERA

A: Airway

  • Check ETT Size and measurement at a fixed point (e.g. teeth).
  • Check ETT Security – that means connections and how well it is tied/taped. I almost always find myself fixing something about security.
  • Check ETT Site – on an X-ray.

duncan c

B: Breathing

  • How well is the patient breathing? It’s a seemingly simple step but yes, I still remind myself.
  • What are the ventilator settings? Got it, now match them (with the transport ventilator). I tend to work with paramedics who make logistics and practicalities in a brilliant fashion. It always seems that just as I get this step done they are ready with a patient slide to transfer the patient onto the stretcher.

duncan c2

C: Circulation

  • What’s the IV access? Secure that well too.
  • What about the arterial line? Critically ill patients being moved should have this so now is the moment to make sure it’s connected, working and zeroed. This usually matches up with when my friendly paramedic is miraculously also up to the exact bit where I should be helping with the monitoring.

ThoreauDown

D: Drugs

  • Think “I need enough sedation for 3 times the anticipated length of transfer” and make sure you’re ready (plus see the bit below).
  • Also have a think about what things you have handy as downers (mostly sedation and analgesia) and uppers (like metaraminol) which might just come in handy if you get the downers bit not quite right (or for other reasons of course).

Bart Everson

E: Everything Else

  • Do you have all the equipment you brought with you?
  • Do you have the notes?
  • Do you have any scans?
  • Do you have ALL the equipment you brought with you?
  • Do you have any patient belongings, either the material ones or the relatives that also belong to them that you might be bringing?
  • No, really, do you have ALL the equipment?


Now, about that sedation

Yes, I gave this its own bit because it is really important. Let’s assume you’re highly skilled at drug-assisted intubation. After that there is the post intubation phase, whether you have intubated the patient yourself or whether the patient comes already intubated.

I think it is really important to make a couple of distinctions in retrieval.  One is you are giving “a Retrieval” and NOT “an Anaesthetic” or “a Sedation”.  An Anaesthetic is an art form so important there is an entire medical specialty devoted to it.  But it is basically focussed on having someone pain free, unconscious of what item number is being performed on them, and then woken to a state of bliss in a a calm quiet environment surrounded by nurses fussing over you.  Usually woken relatively quickly after the item number as well.

This does not apply to retrieval.  In a retrieval you do not want your patient to wake up.  Especially over that last speed hump on the roads leading to the hospital.  With apologies to ICU that your retrieval patient will take a day longer to wake up than someone they lightly sedated you have to remember it is not a “sedation” it is a “retrieval”.

There is very little fussing (doctor dependant) and a lot of shaking up/moving/noise/vibration/stimulation.  When I was a retrieval registrar no one discussed this with me and since I was very comfortable to treat people with morphine and midazolam either together or separately, with propofol, (ketamine hadn’t come into use again when I was a registrar) and with fentanyl I just kept running whatever the hospital had chosen assuming that since they were a hospital they had correctly chosen the right sedation for the right patient.  It was also quicker and easier to just keep running whatever they started as we didn’t have to go through the entire fuss of drawing up new drugs.

I am now, with experience, absolutely sure that this is not best practice.  Now I don’t use propofol at all for a retrieval – it is an ideal anaesthetic drug which makes it very poor for A Retrieval. Of course that is only my opinion born of experience with no published data I am aware of (there is a study for someone) however I can promise you that performing a “retrieval” after intubation requires only two drugs for maximum benefit:  Separate infusions of fentanyl and midazolam.  If you are running two inotropes and only have one pump left I will allow you to mix them together but the ideal concentrations are 1000mcg fentanyl in 50mL and 50mg of midazolam in 50mL.  Run them at 10x higher doses than you would use in ICU so you need to think about starting at 200-400mcg/hr fentanyl and heading north and 5-10mg/hr of midazolam.

And if you arrive and your patient is light and coughing on the tube, if their haemodynamics will tolerate it just give them substantial loading doses of these drugs, say 0.1mg/kg midaz and 2mcg/kg fentanyl and then start your high dose infusion.  I can promise you this will be the best tolerated, most cardiostable way of performing “A Retrieval”.

Just remember the gotcha – as your helicopter starts to land at the hospital it will shake violently for 30 seconds or so.  This will cause your patient to wake up and extubate themselves at the one time you can’t go out of  your seatbelt to fix the problem.  Remember to bolus before landing.


So there you go.  Some of the basics that can help you be the Rock Star you want to be.


Notes:

All the images here are via Creative Commons on flickr and are unchanged here and put up by Izzy by the Sea, Duncan C, ThoreauDown and Bart Everson.

If you have suggestions for future posts hit us up. And if you like the stuff around these parts, you could always consider sharing or signing up to receive emails.


Just a Prick – Things that Might Just Work with Kids IVs

Putting a cannula in kids can be… well, an experience. Dr Andrew Weatherall has a collection of tips and tricks that might just be useful. 


Cannulas. Little people. Not always a match made in heaven. At the joint I work doing kids’ anaesthesia, we often note that they are the great leveller because it doesn’t matter how special you’re feeling, you’re just one lousy cannulation day away from feeling very, very mortal.

They are sort of essential for prehospital and retrieval work though. The thing is that we know that if you’re not working in a designated paediatrics job, the chances are that the little sprocket end of the market is by far the group you see the least. Which is not ideal for gaining and retaining skills.

So short of approaching random families in the street to see if the kids have always felt like their life was missing a cannula and would they like you to help with that (and that is a terrible start-up idea, don’t do that),  you have to make your best of the opportunities you have and draw on thoughts from other people.

So collected here are a bunch of things that help me get those little cannulas in. It’s not an exhaustive list of everything everyone has ever come up with of course. It’s just stuff that works in my hands that I’m sharing, partly in the hope that other clever people will chip in with suggestions in response. There must be some experts out there that we just need to poke enough to make them vomit up their wisdom.

I’m even going to leave out the “give them an anaesthetic and get them to sleep” one because it feels a little like cheating for this scenario.  And for the purposes of this post I’m not going into ultrasound stuff because that’s a whole extra thing. Let’s just put on record that if you’re cannulating for retrieval give it a strong thought.

So in a “not necessarily the most sensible order” kind of way, here’s how I’d think through that whole cannulation palaver:

1. What’s my aim here?

Knowing why you’re bothering with that cannula might seem like a dopey place to start but it sort of determines a bunch of decisions that follow. If you’re in a prehospital setting and you’re thinking of the cannula to get analgesia happening, do you have options you can start with first (intranasal or methoxyflurane etc) that will treat the clinical problem in the short-term and buy you time (plus help the kid, family and you) before getting to the cannula you might need long-term?

Are you adding one as a precaution for transfer? Is that the best choice for the patient and you? If it’s not time-critical do you have time for local anaesthetic options to do their thing?

Do you need the sort of urgent access that might befit an intraosseous option, then quick resuscitation and then an attempt at an IV once there are actually veins that have actual circulating volume in them to work with?

In this setting, it might well be that the IV is exactly what you need of course. But making that an explicit step in your thinking is a good thing. It makes you really prioritise the vital steps for management of the patient.

2. What’s my limit?

This flows from point 1. How many attempts would you consider before you try something new (like a different form of access, or asking someone else to have a go)? If it’s a cannula that must be done, your limits are going to be different than if you have nothing to start with. If you’re in a retrieval, rather than prehospital setting through there might be lots of clever people who can help (or who could do it while you do things that only you can do).

Setting some sort of soft limit where you will stop and reassess does stop you getting into the hole that comes with “I have to get this in” to the point where you forget the primary needs of the patient and it becomes mostly about pride. I’ve been there. A pride hole helps no one.

I don’t think you run the risk of mentally setting up with an assumption that your attempt will go wrong by having that limit either. It’s just about keeping whatever the primary goal of care (which is almost never the cannula itself, but what you can provide with the cannula) foremost in your mind.

Limit Vandys
Thinking and prep time might just save you a bit of time later

3. Super prep

Preparation is pretty much everything here.

The Patient

And whoever is helping them obviously but mainly the patient. If you’re with an awake patient, then telling them what you’re going to do and why is a pretty important place to start. The style that people employ for this can vary but one thing I’d be pretty firm on is that you can’t win by being dishonest. If it’s likely to hurt, don’t promise it won’t. If they’ll still feel pushing (like when you’ve used local anaesthetic cream), probably warn them. Let them know if you’re going to get someone to do the work of keeping a limb still. Explain steps as you go.

Positioning

If you can, choose to work in a position you find comfortable. Removing any degree of strain from your own posture just makes it easier to keep your later movements refined and precise. Not always possible, but working at the right height or even sitting down can make all the difference.

Look Everywhere

Way too often over my career I’ve gone to put a cannula in a spot because it seems convenient and later realised there was a much more accommodating vein somewhere else. There is something even more convenient than a vein that is close to where you’re standing. The vein that will actually help you out that’s all the way over there. Over that other side.

Check all 4 limbs, every time you can.

The Kit

Stuff for cleaning, stuff for doing, stuff for securing. Have it all ready to go (and that includes a back-up cannula ready in case you need to move on to another attempt). Once it’s in you want to be able to have it secured as quickly as possible. And once you’re under way you don’t want to be distracted by needing to reach for anything else.

A really good clean with an alcohol swab has an additional purpose. Sometimes it highlights a change in contour of the skin as the light picks it up and this reveals a vein. Sneaky and appropriate infection control.

4. The Actual Doing

Right. The pointy end. So to speak. Not so certain about this bit? Well these are all things I  do or have seen others do. Comprehensive? Probably not. For everyone? Maybe not but worth a think I reckon.

Choose your cannula

First up, examine that vein and decide which cannula you think will actually go in it. We all love a cannula big enough to rehydrate a woolly mammoth (and think how dried out those codgers would be now), but the truth of paediatric patients is that you don’t need a massive cannula to achieve good fluid loading. And you can definitely resuscitate more effectively with a smaller cannula in the vein than a bigger one in the subcutaneous tissues.

I’d even cope with a not-super-huge cannula in the cubital fossa if that’s what you need to get things rolling. At the hospital we regularly resuscitate kids without a huge cannula. It just needs a syringe and a 3 way tap (and you can actually do with most lines without a 3-way tap). Mostly it’s actually about paying attention and doing it, rather than letting it run.

Line it up

Absolutely the commonest thing I see trainees do when they are struggling is not actually lining up the cannula with the vein it is supposed to slide into. The entry point is somewhere near, but if you look at the barrel of the cannula, it doesn’t line up with the direction of the vein. Good luck with that.

Don’t focus so much on the entry point you forget the rest of the thing.

Make a hole

OK this one is probably more for the retrieval setting (and particularly for tiny ones) though I guess in principle as long as you have good sharps management you could maybe consider it for prehospital work (I’ve never done it there though). Not sure I’d try it in an awake child without some local numbing happen either.

After you choose your cannula, get a needle bigger than the gauge of the cannula. Make a hole in the skin at your entry point. Now when your smaller cannula passes through the hole you shouldn’t have the skin dragged in with it at all. You should lose all resistance at that level actually. Do it right and pretty often you’ll feel the end of the cannula pop into the vein before any visual clue like a flashback tells you that you’ve made it.

Note that having gauze handy for any small amount of blood ooze that would obscure the entry point is helpful here.

Petras Gagilas
Look, not so big you can see light through it, but something.

The saline trick

I think this only works with non-safety cannulae. Basically you fill the hub with saline and when you hit a small vein you’ll see a super quick flashback (even just starting with a quick change in the light in the saline). This one’s particularly useful for getting early warning in tiny veins to avoid going straight through.

Short and sharp

You probably understand that you need to come really flat to the vein with your angle of approach (by all means be at a more acute angle to get through the skin, but approaching the vein should be pretty flat).

The other key bit though is short, sharp movements forward followed by a pause. I tend to find slow advancing just doesn’t do the job in little people’s veins. It’s like the slow distortion of the tissues encourages them to roll out of the way (you can even see it on ultrasound). A sharp move forward, then a pause, then repeat just seems to work better.

The Roll

You get the flashback. Victory! Except you still need to advance and you’re worried it’s a bit small that there vein. So do a really small advance. Then rotate the whole cannula (as in the needle bit as well) 180 degrees. The leading edge of the needle is now closest to the skin, and the pointy bit isn’t going to go ahead and spear the back wall. Advance a little more. Now feed off the cannula.

The Twist

This trick is more well known. Once you think you’re in that vein, twist the cannula off into the vein. In bigger kids it’s probably no help but in smaller veins it does seem to sometimes help get it not to catch up on the wall of the vessel.

Wired for Not Sound

This one is not really a prehospital thing but if in a retrieval-type situation you could consider this one. Have a think about getting familiar with wires for Seldinger options. There are manufacturers out there making short wires that will feed down a 24 gauge cannula. Arrow make one that is 0.018 inches (diameter) and Cook make one even smaller (at 0.015″). When you have one of those cannulae you really want but after you feed it off it’s all gloom, a wire can rescue you.

The technique (with appropriate cleanliness and wire precautions to ensure you don’t lose it in the vein all in place) is to gently start pulling back just the cannula until you have blood freely flowing back. If you gently advance the wire up the cannula at this point it will sometimes find its way perfectly up the vein. If so, you now have an introducer to place a cannula (maybe even one larger than the one used for access).

Not a technique to try in anger for the first time without someone who has done it nearby I’d say.

It’s also worth noting that not all wire/cannula relationships are without challenges. For whatever reason a Surflo 24 gauge cannula will absolutely not allow a 0.018 inch wire through. A 24 gauge Insyte? Well they were made for each other. Go figure.

4. The Strapping

Well that’s a completely different post. I only wish someone had good tips for things like that (like say, here).

For kids cannulas there are a lot of techniques out there and lots of strong opinions about tape. My main thoughts would be:

  • The tape has to be in contact with the actual thing it is supposed to hold. Sometimes I see people holding tapes tight as they put it across the cannula, thereby guaranteeing the tape only contacts the top surface and is then stretched onto the skin. Form the tape closely to the cannula itself. Squeeze it right on there to get maximum tape-to-cannula contact. Then lay it across the skin (no stretching) and put some pressure on it to get adherence happening.
  • Really think hard about things like boards. If they are not adding security for that cannula, you can almost guarantee they are adding annoyance for the patient.


So there’s a start. I bet people have more I’ve forgotten or don’t even know about.

You might just find some of these tips help though. And if that’s the case you will hopefully end up not being the big prick finding it a bit of a prick to get a little prick done for a little kid.

Little kid. What did you think I was going to say?

Notes:

I am not kidding about hoping people will have better tips. That’s what the comments bit is for. Go nuts. Or share the post and see if someone else has one.

Also, if you like the posts here remember you can sign up to get emails whenever they drop. It should be here on the page somewhere.

The images here were from vandys (the speed limit one) and Petras Gagilas (the tunnel thing) and used unchanged from their spot on flickr under Creative Commons.


I Wish I Knew Then What I Know Now – Holding the Line

Back with another instalment in the popular series “I wish I knew then what I know now” is Greg Brown, current Education Manager / Clinical Nurse Consultant with CareFlight and former Australian Army officer.

Intravenous cannulation: the art of finding the biggest tube with a sharp point in your kit and placing it in the most proximal vein you can find so you can deliver various fluids or medications that may or may not make the patient feel better but certainly help you feel as though you have achieved something.

Okay, this might be a bit of a stretch – but in all seriousness the ability to gain and maintain dedicated vascular access in your sick patient is a vital component of medical care for nurses, paramedics and doctors alike. For many (both in and out of hospitals), the ability to find that elusive vein is a point of pride, and getting that solid red flashback in the chamber of the cannula is at times the cue for the treating team to stop holding their breath.

But the IV cannulation process is not complete once the [insert name of your service’s approved form of IV dressing] is applied. In the retrieval world, an IV cannula is almost always going to have fluids flowing through it (or at least attached to it). Having fluids attached gives the healthcare provider a ready-made flush for those medications that are used in treating the patient. Want to give a bolus of IV ketamine? You are going to need an IV flush. IV fentanyl? Flush.  IV anything? Flush. You are going to be flushing everything, so you might as well attach a 1000mL bag of “flush” via a giving set and have it ready at all times.

Herein lies the problem. For anybody who has ever had to move a patient with an IV line attached, you know just how easy it is for that line to get snagged – and before you know it, your precious cannula is now no longer in a vein and instead is irrigating the helicopter floor / CT machine / footwell of the crashed car etc. Your service’s approved form of IV dressing might be awesome at holding an IV cannula in place, but it is no match for the body weight of that burly rescue technician with the IV line inadvertently wrapped around his leg who is moving in the opposite direction to the patient.

Laws to Live By

Many years ago at CareFlight, one of our “grey beards” (Dr Blair Munford, anaesthetist extraordinaire), came up with what we now call ‘Munford’s Law of Taping’ which states:

The length of tape used on the patient should not exceed the distance between the point of injury and the receiving hospital, but anything less is acceptable.”

 Taping IV lines is a good thing, but tape doesn’t work great on wet, hairy or dusty patients. Sure, you can circumferentially tape the IV line to the arm such that the tape sticks to itself and not the patient, but that is a lot of non-stretchy tape.

Story time. Many years ago, whilst on deployment with the Army, I was tasked with transferring a civilian casualty from the scene of a vehicle accident to a landing point whereupon she was to be whisked away to a United Nations hospital by helicopter. The accident involved an overcrowded minivan which failed to negotiate a corner resulting in it rolling. The knock-on effect was a mass casualty incident halfway between two forward operating bases. Medical and security assets were despatched to the scene, including myself as a young (ish) nursing officer.

After the usual initial chaos that results when medicine and tactics collide, we dutifully set about the triage and treatment of casualties in accordance with priorities and started stacking inbound AME assets. Unfortunately, given the topography, the AME teams could not land on site; therefore, we were required to ferry the casualties from the scene to a landing point about 2km away.

One particular casualty of mine was a lady with a mid-shaft femur fracture and a handful of broken ribs. I had applied a Donway Traction Splint to the leg, some oxygen and was trying to bump up her blood pressure with crystalloids whilst controlling her pain with increments of IV morphine. I had placed an IV in her antecubital fossa and had “secured” the giving set with some tape. However, despite the accumulative administration of a lot of morphine (the exact dose escapes my memory), she was still very obviously in pain. The problem? As we loaded her into the vehicle, the IV line became looped around the stretcher handle and the cannula had dislodged.

Ordinarily I’d have just placed another IV and started again; but in this case I had two problems: (1) being a mass casualty incident my stores had been pillaged leaving me unable to place another IV, and (2) the Blackhawk was already flaring (meaning it was about to land), so I didn’t have time to go back to the scene to grab more stuff. This was a major fail when it came to managing this patient. And in addition, the woman’s pain and lack of analgesia were about to become the AME team’s problem, but the embarrassment of losing the ONLY IV access this patient possessed was mine alone.

But, in the words of S.E. Hinton, “that was then, this is now”.

Simple Solutions

There exists a remarkably simple solution to this problem, and it involves a bandage. We now teach this technique to anybody who will listen because, quite simply, there is no good reason for losing an IV. It works on the side of the road; it works in an ambulance; it works in Emergency Departments; and interestingly, it works really well in those dementia patients that occupy their time by trying to undo every single medical intervention you’ve applied during your 12 hour night duty!

Step 1: Place an IV cannula in your patient in accordance the patient’s need and your ability / scope of practice. Apply whatever dressing your service says you should.

Step 2: Attach your primed IV line as per the application of common sense. Ensure that the roller clamp on the line is as close to the bag as possible – you will need to be able to access it.

Step 3: Run the IV line down the limb around 10cm / 4in and cover in a bandage (the broader the bandage, the faster the technique), leave a loop then bandage the IV line back up the limb.

Step 4: Repeat step 3 ending with the free running end of the IV line heading towards the head of the patient (this is where you will be located; if you need to replace the IV bag it’s best if the bag is close to you).

Step 5: Secure the end of the bandage with some tape. Ensure that you leave the side injection ports of the IV line accessible. You may even wish to mark these with tape so that you can find them quickly when under stress.

When you secure the IV line with these superimposed S bends you create 40cm of dead space that will take up the strain on the line if the line is pulled. Once tension is applied to the line the loops cinch together to take up the strain. More of a visual learner? Yeah, me too. See the images below.

Bandage Secure 1

Bandage Pull

What I now know that I wish I knew then is that performing this technique takes no longer than trying to apply copious lengths of tape to a patient’s arm, especially when that arm belongs to a sweaty, hairy person. I also know that I never again want to be the clinician whose handover includes “well, there was an IV in the arm but I kinda lost it in transit…” If it is worth doing, it’s worth securing.


Notes:

We bet this isn’t the only way to secure a line. Got tips for us to learn? Then put them in the comments. We like learning.

And remember if you like stuff on here, have a think about sharing it around. And maybe sign up to get an email when a post hits.

The Red Line – Getting That Arterial Line

There are plenty of times in the land of retrieval (and in some prehospital settings) where you need a little bit more than the simple squeezy cuff gives you. An arterial line. Maybe we could share some tips that work for at least one person with the hope of encouraging people to share theirs. This post is from Dr Andrew Weatherall.

There are things in medicine that are more than a bit disconcerting. Clinical practice pretty regularly asks us to skate back and forth between degrees of uncertainty and deal with it. So you take your reassurance where you can and sometimes that is in the form of a red wiggly line – the arterial pressure waveform. Yes, I’m that sad.

XoMEoX
Look, here is the very evocative image that flickr threw my way when I searched for “red line” under Creative Commons. Think about it.

Given the problems associated with other monitoring methodologies in retrieval medicine having a more accurate option for providing haemodynamic information is invaluable. Add in the option for easy blood sampling and moving a critically ill patient is clearly made a lot more appealing with an arterial cannula in place than without it.

They can be a bit of a bugger to get in sometimes though. Particularly in the area I spend most of my time which is paediatric anaesthesia. Now I don’t have a bazillion answers as to how to make it sure it always hits the spot but there are a bunch of things I always do to try and increase my chances of success. Now these might be things for deploying in little people but lets face it, adults are just big kids. Pathetic, large, disintegrating kids. Anyway, in no particular order here’s a few:

1. Check them all

It’s pretty rare that you need to specifically place an arterial line in one chosen artery for prehospital or retrieval work. Not all pulses were created equal though so it’s worth taking a moment to feel all the candidates to measure them up. Choose the best one for that first shot.

2. Get the position right

Whichever one you choose, it’s worth getting the position at its best for that particular artery. At the wrist I think a lot of us have been shown the wrist extended position, and that is usually pretty useful. It’s worth exploring how extended you need that position though. Sometimes when you go to extreme you can distinctly feel the pulse get a little harder to feel. And while a roll under the hips can make a femoral line just that bit easier, it’s worth doing a before and after check. . The bigger point is that you don’t want to just choose the best pulse, choose the best position for that pulse.

3. Know your kit

This is sort of a good rule for lots of prehospital and retrieval work. You need to know your kit and choose it well. Or if you’re utilising something at the place you’re picking up the patient, make sure you understand it. Different cannulae meet up to to the needle component differently. If you’re planning to have a wire as a back-up to get in (assuming it’s not an inbuilt option) you might want to double check the wire will get through the cannula. Know what you’re wielding. Plus at the same time it’s worth remembering that a smaller cannula in the artery is a lot better than a bigger one you can’t feed in. Choose the cannula you’re sure will get in.

Red dots
This also came up when I searched for “red line”. Bit of a fail there. That’s not a red line, it’s a line of red dots. It’s even called “Red Dots”. What gives flickr?

4. The Wire Bit

While I’m there, a wire can obviously be a pretty good friend. I know plenty of people who prefer the technique where you transfix the artery, come back and feed the wire up once the blood is flowing back freely. Plus get a smaller cannula in (see above) and that wire becomes the tool to dilate up to a larger bore cannula.

5. Sit Down

I know this seems really minor and maybe you feel strongly that you’re only doing it right if you’re in a moving vehicle and the family cat you brought with you to comfort the owner is sinking its claws into the back of your neck or up your nostril or something. The thing is trying to not let the environment control you is part of the gig. When you sit down you can set up your ergonomics a whole lot better and position yourself to take away muscular strain and fatigue while you’re doing it. So if the space allows it, sit down and get comfortable.

6. Side to Side and Up and Down

Now that you’ve hopefully found a comfortable position, it’s worth really mapping out that artery. Maybe other people have more sensitive fingers than me but I generally find that placing a single finger on the pulse and trying to centre it in the middle of the pad of my fingertip helps me get a sense of where it is. I then use that same finger to feel up and down the artery and figure out its course so I can mark it on the skin. It actually doesn’t matter a huge amount if the mark is perfect as long as I can go back, feel and understand where I’m feeling the artery in relation to the obvious mark I’ve made. I do this every time to help construct a picture in my head of how it all lies, even before I get onto ….

7. Use an ultrasound

If it’s available, then probably just use it. The evidence says that you’re more likely to get it in without incident and it’s unlikely to be a slower endeavour. Using the ultrasound well still demands good patient and clinician positioning as well as a scout scan up and down the artery to understand its course and any surrounding stuff. Small ultrasounds are now good enough that you should be able to pick up the tip of the cannula all the way into the middle of the vessel (and spot when you’ve still got a little bit of tissue indenting at the wall). Just use it.

8. Short, sharp, flat

It makes pretty obvious sense to approach without too steep an angle (though sometimes you can pop through the skin better with that sort of angle). A flatter approach maximises your path in the vessel which maximises your chances of staying in there. When it comes to movements I find an approach with short, sharp advances more successful than a slow steady push. At least in kids sometimes the latter seems to allow that artery to squeeze out of the way (but I’m happy to be pulled up on that one).

9. Also use local

If the patient is awake of course. Why?  I think that’s actually an obvious one.

Marco Galasso
This one, also came up on the “red line” search but really it’s about the dog. So maybe if you want to get arterial lines in, think more about puppies?

10. Be ready for success

You’re probably going to be brilliant so be ready for that not surprised. Having those tapes and connections ready so you can focus on the bit after the cannula (particularly trying to maintain a clean and dry field so everything sticks and you don’t have a bunch of stuff to clean up) lets you get on with actually using the monitor.


So there is my meagre collection of practical bits and pieces. In the prehospital and retrieval space I can’t always guarantee that I can set myself up like I can in an operating theatre. When I make the effort though it turns out I usually don’t have to compromise that much. And that effort usually makes the whole thing go a little bit smoother.

It’s also not an exhaustive list. So if you’ve got a top tip then hit up that comments section. I could use a tip to be better next time I’ve got to step up to the red line.


Notes: 

The main reference to read for this one would be this Cochrane review looking at success rates for arterial cannulation in kids using ultrasound. The short version is yes, do that.

All the images here were from Creative Commons posts on flickr.com. The first is from XoMEoX, the second is from Håkan Dahlström and the third is from Marco Galasso.


I Wish I Knew Then What I Know Now: Simple Airway Management

This is a popular series and it’s not hard to see why. Greg Brown drops back in to talk about the airway device that is now his go to item. 

I clearly remember a time when the escalation of airway management in prehospital care resembled the fabled Underpants Gnomes from South Park and their three step plan to making a profit.

Back then, airway management looked something like this (and yes there were four steps, not three like in South Park):

  1. Patient’s own airway – bummer; that’s no fun for anyone.
  2. Oropharyngeal airway (aka the Guedel) – fun but not that inspiring.
  3. Endotracheal tube – break out the high fives, it’s a good day to be a medic.
  4. Needle cricothyroidotomy – if an ETT doesn’t do it, a 14 gauge cannula in the throat ought to fix it. Then there are the mutual backslaps.

Back in the day when I was new to military prehospital care (and at a time where not much was happening in the world) the focus seemed to be on big ticket items and not the purpose of the interventions. Indeed, it seemed to me that the drug of choice for any airway problem was plastic; and the bigger the problem, the smaller the dose.

What I know now is that the one’s choice of procedure must consider a whole lot more than just self-gratification. Airway problems are generally either an oxygenation or a ventilation issue, and the choice of procedure must take at least this into account. However, the purpose of this post on the Collective is not to discuss the differences between CICV and CICO (nor the relative advantages of DL vs VL) but simply to discuss basic airways.

Simple Is As Simple Does

There is no doubt that a patent airway that was issued to the patient at birth is best for the patient. Therefore, it goes without saying that anything that can be done by the treating professional to maintain a patent natural airway should be at least considered. I am not going to go into how best to clear an airway and position a patient as there are a myriad of reputable sources out there for you to conduct your own research but I will make two important points:

  1. In a perfect world the “ideal” position will align (and therefore open) the upper airway; seemingly minor changes in positioning can have significant detrimental impacts on airway potency (and vice versa); and,
  2. If you don’t know how to position a patient or provide manoeuvres then you might want to consider taking a step back and booking into a first aid course. Quite quickly. Like right this second. Just do it ….

Still here? Good then, on with the show.

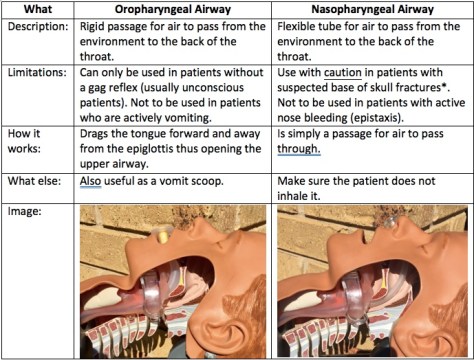
Which means it’s time to introduce one of the heroes: a simple artificial airway. To Guedel or not to Guedel? For many years that has been the question, and the oropharyngeal airway (OPA) was definitely my plastic of choice. Simple to insert and effective – two of my favourite things in a medical device. But are they deserving of their historical gold medal for simple airway adjuncts? Well, maybe yes and maybe no.

You see when it comes to simple adjuncts I have become, over the years, a massive fan of the nasopharyngeal airway (NPA). I would argue that they are just as simple to use as their orally inserted cousins – the operator just needs to be trained in their use. And whilst there are pros and cons to all medical interventions in my mind the NPA has one big benefit over the OPA – when (if) the patient starts to rouse the NPA can stay in, a handy thing for those pesky patients whose level of consciousness ebbs and flows.

Over the last ten years the NPA has gained popularity amongst first responders with thanks to support from some international heavy hitters, and not before time. You see, the NPA was actually invented before the OPA – 38 years earlier, in fact, by Joseph Clover of the Royal College of Surgeons (he later became a founding member of the Royal College of Anaesthetists) in 1870. The first OPA was designed by…. wait for it… Frederic Hewitt in 1908. The first “Guedel” was not even invented by Arthur Guedel whose name is now synonymous with the device. He didn’t enter the scene until the 1930’s (but I will grant that he made huge improvements to Hewitt’s rudimentary designs).

However, it was not until 2002 and the widespread introduction of Tactical Combat Casualty Care (TCCC) in militaries worldwide that the NPA started gaining favour once more. With thanks to a push from the United States Department of Defense’s Special Operations Command, NPA’s started making their way into the individual first aid kits of soldiers, sailors and airmen employed in combat operations. Indeed, by 2008 every Australian serviceperson employed in combat roles carried an NPA in a pouch alongside appropriate haemorrhage control devices. NPA’s are now taught as part of C-TECC guidelines (the civilian version of TCCC) and are now commonly the first artificial airway device reached for by those employed in first responder roles worldwide.

Table

Are there risks associated with the of an NPA? Well, this is medicine, isn’t it? Of course there are risks. The big one that everybody immediately jumps to is in the patient with suspected basal skull fracture (or a fracture of the cranial vault). The risk in inserting an NPA here is that the tube may indeed enter the cranial cavity instead of heading into the nasopharynx. But a review of the literature reveals only two cases where this occurred thus making it a rather extreme reason to be afraid of using an NPA. (Note: that same review of the literature also revealed an article advocating the use of nasopharyngeal airways in the treatment of watery diarrhoea…. Four words: single use only please!)

Putting It To Work

So how do you utilise an NPA (and I’m talking about as an airway device, not in treating diarrhoea of any consistency)? Well firstly, size matters. I am sure that at some point you, like me, have taught various methods. The first common method is to look at the diameter of the patient’s pinky finger – in theory, this is the same diameter of the nares (nasal openings). Therefore the NPA of choice should be the diameter of the patient’s pinky. Yes?

Alternately, the second common method of sizing pertains to length – in theory the distance from the nostril of choice to the tragus (that flap at the front of the ear where it meets the cheek) is the same as from the tip of the nose to the upper pharynx. Yes?

Well, research by Roberts et al in the EMJ found that a combination of the two methods is required to get reach NPA nirvana and that in fact the patient’s height was a better determinant of requisite NPA size. They used data from MRI scans to determine that, all things considered, the law averages reigned supreme. Average height male? Size 7.0mm Portex NPA. Average sized female? Size 6.0mm NPA. Or, you could await the rollout of the MRI App on your smartphone of choice…

Once you have selected the correct size NPA you simply pick the largest nostril, lubricate the outside of the NPA (the patient’s saliva is usually sufficient) and insert whilst aiming for the patient’s ear (the same side as the nostril you are using). By aiming for the ear you are pushing backwards, not upwards, thus reducing the risk of the NPA entering the cranial vault in that patient with a suspected basal skill fracture. For this reason the presence of a suspected basal skull fracture has relegated to the status of relative contraindication (no longer an absolute contraindication). If any significant resistance to insertion is felt then the attempt should be aborted and the other nostril attempted.

Be sure to consider how you will secure the NPA. Certain members of society have naturally wider nares and I’ve seen them inhale their NPA. Placing a large safety pin through the shaft of NPA just below the flange decreases the chances of this happening, but in most patients I’ve treated the safety pin has not been necessary.


So there you have it – another thing that I know now that I wish I knew then is that the NPA is not an evil device guaranteed to lead any patient who has ever experienced a blow to the head on a one way trip to the morgue. Rather, the NPA is now my simple airway of choice, an intervention that I have used countless times both on battlefields and in emergency departments, and is the only airway device that I carry on every single job. Oh, and it also has some purpose in treating patients with watery diarrhoea…apparently.


Notes:

Remember if you like things on this site there’s a box somewhere where you can throw your email address so you get a regular email when a new post hits.

Want to know about how your choices of airway adjuncts can affect ventilation? Then go here.

Interested in reading more about the facts and myths of NPA’s? Try this.

Here’s a cool little video about airway manoeuvres and simple adjuncts from that good crew at Life in the Fast Lane.

And a previous post that included the use of NPA’s in the tactical environment can be found here.


I Wish I Knew Then What I Know Now (Edition 2 – Packs)

Continuing a theme started with a practical post on direct and indirect pressure for haemorrhage control, Greg Brown (Education Manager amongst other things) discusses the things he’s learned about how to figure out what you need in a kit. 

I remember the first time as a young Nursing Officer in the Australian Army I went on exercise (that’d be “manoeuvres” for you Americans, and “war games” for those that watch too many movies) and had to pack a medical kit. Not knowing what was required for the job (and not asking either) I had earlier visited the field pharmacy with a request that was essentially “one of everything you have, please Ma’am”.

The result? I spent three days being cold, wet, hungry and slow – the sheer size and weight of my medical kit meant that I had not enough room for “luxuries” such as a sleeping bag, raincoat or enough food.

Now what?

So, what has changed over the years? Well, I’d like to think that a lot has changed. Firstly, I now have the experience to know that if I cannot do my job (because of issues pertaining to cold / heat / hunger / thirst / ability to keep up etc) then I am a liability and not an asset. I have also learned that the greatest skill ANY prehospital care provider can possess is the ability to improvise. And finally, I’ve learned that big ticket “Hollywood” style medicine does not keep people alive but that, as a popular Australian breakfast cereal advertisement from the late 1980’s stated so eloquently, “the simple things in life are often the best”.

It is important to realise from the outset that there are arguably more variables in life when it comes to medical kits than there are medical conditions that need treating. Okay, that is a bit of an exaggeration, but hear me out. When creating a medical kit the individual must ask themselves a series of five questions that will guide the size, contents and capability of their kit.

Question 1: Who will be using the kit?

If the answer is simply yourself, then you can afford to consider taking items that are your favourite but not necessarily everybody else’s preferred option (caveat: they still need to be evidence based and supported by your clinical practice guidelines / protocols). An example is in regards to airways: you might be an avid supporter of the iGel whereas I sit firmly in the LMA Supreme camp whilst there also exist individuals who like the King-LT. One could argue that they all do similar things and possess commonalities (e.g. blind insertion, semi-secure airway etc) yet they each require necessary knowledge, skill and attitudes in order to make them work. The solution, in this case, is standardisation – not three separate but similar airway devices.

Question 2: What is the kit expected to be capable of doing?

Within CareFlight we have many different lines of operation; for ease lets call them Sydney, Darwin, International and Off-Shore. So, take our Sydney operation – CareFlight Rapid Response Helicopter (CRRH). CRRH works as part of a wider retrieval network to service the Sydney basin. The majority of its taskings are to traumas and near drownings, so its kit reflects this. CRRH is unlikely to be tasked to a ketoacidotic haemophiliac with sepsis on a background of COPD. Why? It services the Sydney basin where there are also around 50 ambulance stations, each staffed with well trained, well equipped and well-motivated paramedics who are standing by to deliver the patient to one of a dozen equally well staffed / trained / equipped / motivated hospitals, that are available 24/7. If CRRH is treating and transporting this patient then it is because they’ve been ejected off of their motorbike whilst completing stunts at the local motocross track (again, perhaps a slight exaggeration for this particular patient), so the activation is to a trauma. CRRH’s kit must reflect this, just as the Darwin, International and Off-Shore kits must (and do) reflect their demographics.

The same goes for medical kits of a more “tactical” nature. If your tactical kit (the one you wear on your rig when conducting a deliberate action / breach / clearance etc, or every day because you are clever and “that’s how you roll”) contains a laryngoscope then I’d respectfully suggest that you’ve got it all wrong. Interventions in this environment need to be high yield and rapidly applied whilst allowing for the maintenance of situational awareness. If you are head down / bum up intubating, you are not accounting for your own safety. Besides, is the expectation now that this patient will self-ventilate? Or does your tactical kit also contain a self-inflating bag or mechanical ventilator?

Question 3: How long does this kit need to last? 

This is a question of stock holdings. When I think back to that first Army exercise in a medical role of mine I now ask myself “it was only three days long, so why did I need seven days’ supply of three different oral antibiotics – especially when we were within two hours walk of a field hospital?” My stock holdings were all wrong. Chatting with many others over the years (both military and civilian) I have found that this can be a common theme amongst pre-hospital care providers.

If some is good, more must be better, right? Wrong – more just means bigger, heavier and slower. Besides, if you brought it – you’re carrying it.

But what if one fails, won’t I need a second / third / fourth? To this I offer that if your plans are built around multiple failures in equipment then it is time to revisit your equipment list and look for alternatives that are more robust and reliable.

An important consideration when assessing how long your kit needs to last is: what is your mission? If your mission is to conduct humanitarian assistance in the wake of a natural disaster for a period of seven days then you are going to need a LOT of stuff – trust me, having deployed to a few natural disasters in my time you will require a very robust supply chain. But if your mission is to treat and transport one victim of that natural disaster at a time with a resupply between each mission then you don’t need that much gear. Besides, generally speaking the less you carry the faster (and further) you can travel.

Stock holdings are a balancing act. It is reasonable to build some redundancy into your medical kits (ever had that one vial of morphine in your kit smash when someone decided to use your kit as a stepladder?) but it must be balanced with the knowledge that if you brought it, you’re carrying it.

Question 4: Is the kit a “stand alone” or designed to be augmented?

Capability should be viewed in terms of three things:

  1. people;
  2. equipment; and
  3. the ability to effectively combine the first two points.

I learned a long time ago that I was never going to be the only person in a group with medical training. Every “operator” (e.g. police officer, fire fighter, soldier, aircrew member, emergency service volunteer etc) has basic first aid training (and sometimes much more) and many will carry their own supply of essential items (i.e. arterial tourniquets, bandages, gloves etc). In situations where medical attention is required, medical personnel need to utilise the capabilities provided by others.

It is always worth considering this concept of capability when forming your plan; planning to combine medical kits in order to create improved capability is a useful concept. Most military and paramilitary units do just this; as an example, the Australian Army’s Parachute Surgical Team (PST; now superseded) built its equipment plans around the “what ifs” of war and how to ensure enough capability without carrying a whole hospital worth of equipment.

What do I mean by the “what ifs”? Well, I’m glad I asked myself this question.

What if the plane carrying the equipment got shot down before we could drop the stores? Well, each member of the PST parachuted with a medical kit that, when combined with those that others carried, formed an interim resuscitation and surgical suite. What if a paratrooper and his / her kit went missing? Well, there were just enough team members to space out on separate aircraft to create two identical suites. What if a paratrooper required more than first aid on the drop zone or during the advance? Well, each kit also contained the stores statistically required to treat a battle casualty.

Each kit creates a capability; but when combined they can provide so much more. This is an important concept to keep in mind when designing your medical kit.

power-rangers
It’s a bit like the Mighty Morphin Power Rangers. Individually they don’t necessarily get the job done but when combined they offer … Spandex. And also getting things done.

Question 5: Can you actually carry it? 

Size matters. I’ve said it a few times already, but size really does matter – if you brought it, you’re carrying it.

For a medical kit to be effective it needs to be capable of getting to and travelling with the patient. Therefore, if it is so big and cumbersome (because you packed one of everything…and some redundancy) that you cannot get to the patient then you need to ask yourself “what is the point?”.

Now, I will freely acknowledge that different sizes are required for different tasks – in fact, I have four different kits in my personal armoury for four different purposes. Similarly, CareFlight has different sized kits for different tasks within its separate lines of operation.

So some things to consider include:

  1. Is this kit staying in a vehicle (if so, what type of vehicle?) or does it need to be portable by an individual?
  2. If it is portable, what else is that person carrying (e.g. a tactical kit will likely sit between other pouches / holsters on a belt or chest rig whereas a bigger kit may come with shoulder straps or need to fit inside another pack)?
  3. When packing it, how many pouches will you need to open in order to perform one intervention? (Note: the answer should be one; if your IV cannula, sterile wipe, venous tourniquet, securing tapes, bung, giving set and fluids are not together then you’ve got it wrong.)
kits
OK I may have a bit of a kit fetish but each one has a specific purpose in life. Beyond just making me happy even.

Summary

So there you have it. Added to the list of “things I know now that I wish I knew then” is medical kits. I now start with an analysis of the mission, draw out the likely tasks, consider the need for redundancy, look at what else I need to carry and consider the overall capability. What I don’t do is request “one of everything please, Ma’am”.


Notes:

This one is much more of a recount of personal experience so there aren’t a heap of links to send you to. It would be great if people could give examples of how they think about their kits and what they carry though. It’s a good bet there are clever people out there who would point out things that haven’t come up here.

Oh, and don’t forget if you like the stuff on here there should be a spot somewhere on the page that lets you follow along so you’ll get an email when a post goes up.