
So you’re out there somewhere and you really want to do a thing you think might help but you don’t have your standard kit. Can you adopt the lessons of Richard Dean Anderson and improvise? Mel Brown has you covered.
Okay, so I am guessing from the title of this post you have a good idea of my age….I am talking about the original MacGyver, not the new one. And for those of you that are too young to know who I am talking about…..MacGyver could improvise everything he ever needed from anything that was “just” lying around. I once saw him create an explosive device with little more than a pepper shaker and some foil wrapping off some chewing gum.
It is wonderful that we live in a world where most of the time we have access to all we need (and more), including our medical equipment. But what happens when you don’t have what you need (or don’t have enough of what you need) to treat your patient?
So in line with our series on “I wish I knew then what I know now” we are going to look at MacGyvering (improvising) arterial tourniquets and pelvic binders – two devices that we are all very familiar with (or if you’re not you can be if you go …
These easily reproducible techniques are certainly something I wish I knew about when I first started nursing…..and no, it wasn’t when Florence was around (although I am pretty sure she trained one of my lecturers).
Continuing with the History Theme
Did you know that arterial tourniquets have been around for a while now? In fact, the first combat commander to advocate the use of tourniquets was Alexander the Great – he based his decisions on the works of the medical researches at Cos.
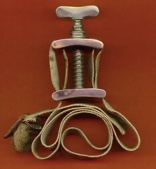
However it wasn’t until 1718 that Louis Petit, a French Surgeon, developed a “screw device” that could be placed over blood vessels to stop flow. From the French verb “tourner” (to turn), he named the device “tourniquet.”
Improvised Arterial Tourniquets
One of the most important things to remember with any arterial tourniquet is that indirect pressure MUST be applied whilst the tourniquet is being applied. This will at least minimise if not stop the bleeding whilst the tourniquet is being applied…
Improvised tourniquets need to be at least 5cm wide to ensure adequate arterial occlusion can be achieved. Have you ever wondered why a shark attack victim that has had an improvised tourniquet applied to their bitten leg (usually via a surfboard leg rope) soon begins bleeding again after the bleeding was originally stopped? Well the theory goes that the initial narrow occlusion of the artery was enough to completely occlude the artery but as the pressure proximal to the point of occlusion builds up behind the narrow improvised tourniquet the arterial pressure is able to beat the tourniquet and the patient begins bleeding again. You need something applied over a wide area to get the job done.
So, what should we use? Firstly you need to find a windlass device that is thick enough and tough enough to withstand the pressure applied to it as you twist it to tighten the tourniquet (which can be up to 300mmHg of pressure). Some things (and only some, there would be more) that are readily available include:
- A thick solid stick (not always ideal)
- An indicator lever (probably not out of your own car)
- A screwdriver
- A tyre lever
- A set of pliers
As for the tourniquet itself, what should be used? Some materials used with good effect include (but again are not limited to):
- Triangular bandages (make sure these are the cotton ones and not the cheap paper ones)
- Seatbelts (once again probably not out of your own car)
- Canvas belts
- Shirt sleeve (preferably with non-stretchy material)
- Neck ties (not sure how many of these are around these days).
One of the issues with improvised tourniquets is the narrowing of the tourniquet at the windlass point. This can pinch the patient’s skin and make an already painful intervention more painful. The narrowing of the tourniquet material can also lead to greater damage to the underlying skin, muscles and nerves. Having said that I am not sure the alternative of death due to blood loss is ideal either.
I think many of us have spoken about how we could improvise an arterial tourniquet….but how do we actually do it? Let’s use the triangular bandage as our improvised tourniquet to discuss this in detail.
- Ideally you want two triangular bandages – lay the first one along the arm or leg.

- Wrap the second triangular bandage over the first and around the arm or leg and tie a knot or two.
- Place the improvised windlass rod on top of the knot and tie two more knots to secure that windlass (note: if you can’t tie knots, tie lots).

- Turn the windlass until the bleeding stops and then turn once more. Secure the windlass in place with the first triangular bandage.
If you forgot the first triangular bandage you can use gaffer tape (or equivalent) to secure the windlass in place.

It is important to still write “T” and the time of application somewhere obvious (maybe on the patient’s forehead would catch the eye) as you would for any arterial tourniquet. Obviously improvising is not ideal when compared to commercially available products. However, they are life saving for your patient when you don’t have the equipment that you need available.
Improvised Pelvic Binding
Improvised pelvic binding has been widely used throughout Australia by our Ambulance services for a very long time – I think most people would be familiar with pelvic sheeting. There’s some nuance around when pelvic binding may or may not be useful (just check out the posts here, here, here and here) but what do you do if you’ve made an assessment it is worth trying and you’re without your fancy gear?
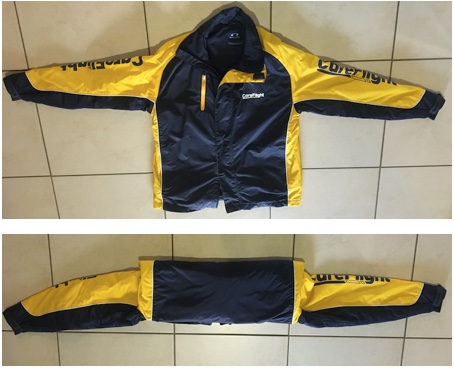
Well we all go driving or hiking with sheets in our car boot (that’d be a trunk for our North American friends) or backpacks, right? I don’t think so, and I know I certainly don’t. So what do we commonly have on us that we could use? A jacket works well as an improvised pelvic binder. Let’s have a look at what this looks like:
- Prepare the jacket for use. Use the arms as a width guide and fold it up like so.
- Place the jacket under the smalls of the knees where there is a natural hollow.

- Preferably with two operators seesaw the jacket up to the correct position over the greater trochanters.

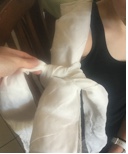
- Bring the arms of the jacket together and tie a knot.

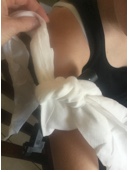
- Twist those sleeves until the required pressure is achieved.

- Secure that knot (gaffer tape works again, or zip ties or equivalent).

- You’re done. And maybe cold, but done.
Once again it is obvious that improvising is not ideal when compared to commercially available pelvic binders. However they are life saving for your patient when you don’t have the equipment that you need available. All interventions, whether improvised or not, must be continually checked for effectiveness – especially if your patient is moved.
Summary
It is important that as clinicians we understand how to use the commercially made equipment we have available to us. However, it is just as important that we know how to improvise life saving interventions as there will be a time when we won’t have our equipment (or enough of it) to treat our patients. This is a predicament that I certainly don’t want to find myself in. So let’s share what we know as shared knowledge is power. Or share what MacGyver knows because that is also power.
A bit more reading:
Those posts on arterial tourniquets and bleeding are here.
Pelvic fractures? Look here, here, here and here.
Feel like doing the sort of reading that means your improvisation is actually not just making stuff up in your head quickly?
Try these:
